Topic 8
Sessions, Logins and Middleware
Today we will take a look at session variables and how we can use them in Node.js. We will also look at how we can make use of session variables when developing login systems. As part of our discussion we will introduce the concept of middleware.
Cookies
Before looking at session variables, we will quickly take a look at cookies. You have probably come across cookies before: they are data saved on your machine by a website when you visit it. They are stored in an area of your machine known as the cookie jar and are sent to your browser embedded within the HTTP response. Next time you visit the site, the cookie is sent back to the site via the HTTP request, and thus the site can "remember" data saved by it at the time of the last visit. Cookies can be used for various things, both benign and controversial. For example:
- They can be used to save preferences, such as language, colour scheme or font size;
- They can be used to remember your username, so you do not have to fill in the username field next time you login;
- Slightly more controversially, they can be used by advertising networks to provide appropriate adverts based on what pages you visit;
- Most controversially of all, and most would say unethically, cookies can be used to build a profile of what kind of person you are including such things as personality type and political persuasions (based on sites you visit, things you search for, your comments on social media, etc), which can be exploited in such things as election campaigns and referenda through targeted advertising.
Consequently a user needs to be careful with cookies. It is now law (in Europe including the UK) that a site which uses cookies for non-essential purposes must allow the user to turn such cookies off, and this functionality must be clearly visible to the user.
The diagram below shows how cookies work: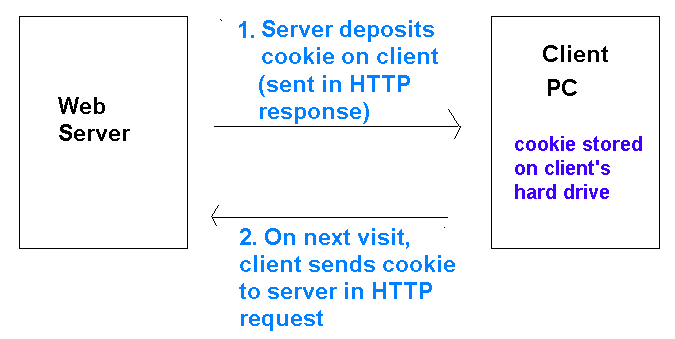
Session variables
Having looked briefly at cookies, we will now start to look at session variables.
- Special variables used to maintain state, i.e. preserve information between successive HTTP requests
- Unlike cookies, they are stored server side - typically in a database
- ... and are thus more secure than using cookies, which are stored locally in the cookie jar on the hard drive
What is a session?
- A session is a continuous period of interaction between a user and a website
- The session ends typically ends after a specified period of inactivity, in which the user is not interacting with the website (this is configurable)
- Session variables remain accessible throughout a session
- ... but are destroyed when a session ends
- So unlike cookies, session variables cannot be used to save data between separate visits to a website...
- ... but only throughout a single visit to a website
Using session variables in server-side coding
- Session variables can be used in any scenario where we want to preserve information from page to page
- Common uses of session variables:
- Login system: - use a session variable to remember the currently logged-in user
- Shopping basket: - on an e-commerce site, store the shopping basket in a session variable so that it can be remembered across all the pages of the site
How sessions work: Multiple clients, one session variable
- We are now going to look at how sessions work "under the hood"
- Remember that session variables are stored on the server - typically in a database
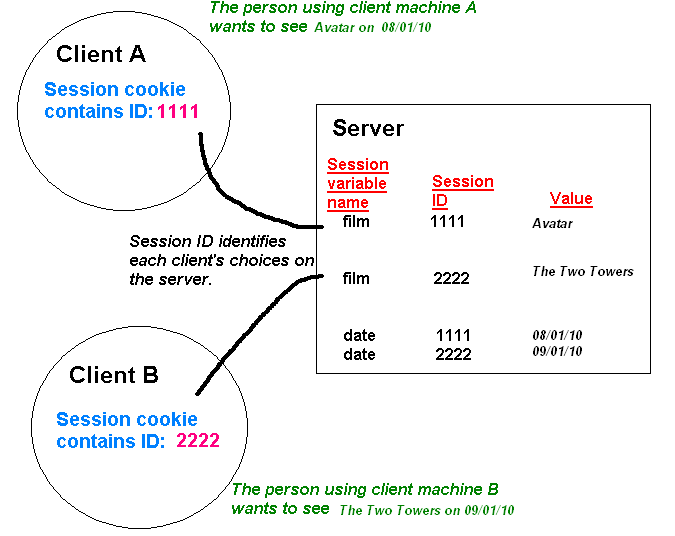
- Imagine a cinema booking website, which uses session variables called film and date to store the user's chosen film, and the date they want to see it. What if more than one user was using the website at the same time? How would the website distinguish between the values of these session variables for different users?
Session IDs
- Each client which connects to the server is given a unique session ID number
- On the server, the same session variable from different clients is distinguished by the session ID and stored as different entries in the database
- The session ID is normally stored on the client as a cookie (more on that below)
See the diagram below
Session cookies
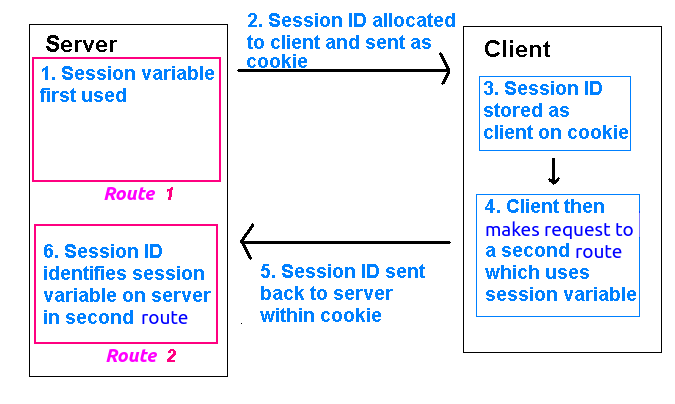
- Usually, when a session variable is first used, the session ID is sent to the client in the HTTP header of hte response as a cookie (the session cookie). You can see this by inspecting the HTTP headers of the response in RESTer.
- When a session variable is used in a later page, the server retrieves the session cookie (containing the session ID) from the HTTP request and uses it to obtain the correct value for the session variable for that user
- The data itself is NOT stored as a cookie, only the session ID is!
- The session cookie expires when the user closes the browser
How a session is maintained
Using sessions in node.js
First - setting up proper type checking for the server
So far, we have not added our server to tsconfig.json. There are some other factors we need to consider given that Node.js is used (via tsx in our case). We need to add these additional settings to our tsconfig.json:
The issue here is to do with the JavaScript that tsc outputs; we need to ensure that no errors occur when Node.js tries to run the output JavaScript. For example if ES6 modules are used, the .mjs extension is needed while if CommonJS (require not import) modules are used, the .js extension is needed. The above settings specify the Node.js standard to use in the output JavaScript to ensure no errors occur: nodenext uses the latest Node.js standard.
Introduction
Most server-side technologies can use session variables. Some technologies, such as PHP, come with session variables enabled by default as part of the core distribution. With node.js, we have to use a third-party module depending on which server framework we are using. With Express, the usual module is express-session which can be installed in the normal way:
express-session will create session cookies and send them back to the client automatically, and also retrieve session cookies from clients and use them to work out the correct session variables for that user. express-session will store session data in a session store. You can configure express-session to tell it which session store to use. By default, it uses an in-memory store, but this is regarded as insecure. Instead, it is better to use whichever database you are using to store the session data, which in our case will be SQLite. So we will need to install the express-session-better-sqlite3 module:
The module will store the data in a table called express_session by default, which you might want to look at to see exactly how the session data is stored. Each entry in express_session contains a JSON object with the session ID plus the values of the session variables themselves.
Requiring and setting up the modules
This code demonstrates how we can require and setup the express-session and express-session-better-sqlite3 modules. First we import the two modules, as well as express and better-sqlite3:
Then we create an SQLite database to contain the session data, and using it and the expressSession object, create an object for creating a store.
Once we have done this, we can initialise the Express session object itself. You have to specify quite a few options: these are summarised in the comments accompanying the code and explained in more detail on the NPM page for the module. The options below should be good for use with the SQLite3 session store and common web applications.
The code above will set up the session using the given session store. Note how expressSession() returns a middleware function which sets up the session, which is then used by the application.
However, how do we actually store data in session variables?. We can use the object req.session, which is setup as soon as you have initialised your session as above. For example, we could use code such as:
to setup a session variable called name. This session variable could then be used by all subsequent requests, until the session is deleted. To end a session, we can call its destroy method. This takes a callback function which runs when the session is destroyed, e.g.:
Setting up sessions in TypeScript
Additional steps are needed for setting up express-session and express-session-better-sqlite3 in TypeScript.
Missing type declaration for express-session-better-sqlite3
express-session-better-sqlite3 does not have a corresponding @types/... type declaration package to define the types used by the module. This will cause an error on import. To solve this, you have to add a "mock" type declaration file containing nothing, other than stating that the module exists. This must be called express-session-better-sqlite3.d.ts (d stands for type declaration) and simply declares its existence:
It is recommended to add this file to a types folder. You will then need to set the paths option in tsconfig.json as follows:
This specifies to look inside the types folder for imports which cannot be resolved.
Extending the SessionData type
The req.session object is of type SessionData. This leads to a problem when trying to add properties to it, as they are not part of the type. To fix this we can use module augmentation with declaration merging. We would use code such as this:
How is this working?
- the
declare modulesets up a module augmentation forexpress-session. Module augmentations allow us to add additional content to existing modules. So here, we are augmenting theexpress-sessionmodule. - within the augmentation, we are apparently declaring an interface
SessionDatawith one property,username. This will trigger declaration merging. We can declare the same interface multiple times, and all the declarations will be merged together into one type. In this case, our ownSessionDatainterface will merge withexpress-session'sSessionDatainterface, allowing us to add ausernameproperty to it.
We can place the module augmentation inside a separate .ts file. We then have to add this file to the files property of our tsconfig.json for it to be read.
Session variables and Authentication
A common use of session variables is in site authentication. In authentication, the user must enter a username and password to gain access to the site. What happens is as follows:
- An authentication route tests that the user entered a valid username and password on a web form
- If they did, we store the username in a session variable, e.g.
req.session.username - We also write a logout route which sets
req.sessiontonull, as described above, thus terminating the session. - We protect any routes which we want to restrict access to logged in users by writing a piece of middleware which checks for the existence of this session variable.Thus, such routes are "locked out" to unauthorised users
Here are some routes (an extract from a full server) to manage authentication. Note how we send the HTTP code **401** (Unauthorized) if the login details are incorrect.
What do these routes do?
- Firstly the
/loginPOSTroute checks thePOSTdata sent to it, specifically theusernameandpasswordfields. Here, it simply checks that they are equal to SimonSmith and secret respectively. If the details are correct, the supplied username is stored in a session variable (req.body.username). This is a deliberately simple example: in a more realistic example it would need to check the username and password are in the users table in the database. - Next, the
/logoutroute setsreq.sessionto null and in doing so, removes the session from the session store. This will mean thatreq.session.usernamewill no longer exist. - The next route is the
/loginGETroute. This returns the currently logged-in user within a JSON object, ornullif a user is not logged in. This can be used by clients (e.g. AJAX front ends) to display the currently logged-in user in the UI.
Middleware
We've looked at how we can implement a login route. However, the other thing that we have to do is prevent certain endpoints being accessible to non-logged -in users. How can we do that? One way is simply to add a session check in every route which we need to protect:
This works, but it quickly becomes repetitive, adding the same check to every route which needs it. To more efficiently "protect" multiple routes, we can make use of middleware.
Introduction to middleware
Middleware is code which runs in between two application components, modifying or verifying data passed between those components in some way. In the context of web APIs, middleware consists of code which runs after the request has been received, but before a request is handled with a route. In Express, each piece of middleware is a function which can modify the req and res objects. It is typically used to prepare the request before it's handled, or intercept requests to perform operations such as logging. express.json(), which you have already seen, is actually middleware. It parses JSON from the body of the incoming HTTP request and adds a body property to the req object allowing you to easily access POST data. Without the middleware, the body property of req would not exist.
Middleware is included with the use() method of your app object, or with get() and post() if you only want a certain piece of middleware to run with GET and POST requests, respectively.
You've already used middleware, in fact, perhaps without realising it. Remember how we use express.json() to allow our Express server to handle JSON sent to it via the request body. Note how it is included with use():
So in fact we are using middleware here. Specifically, the middleware is parsing the JSON sent through the request body into a JavsScript object and adding it to the req (request) object as req.body.
Writing our own middleware
You will frequently want to write your own middleware. An item of Express middleware is simply a function which takes three parameters - described below - and can examine the request or modify the request and/or the response. The three parameters taken by a middleware function are:
- the request object (typically called
req); - the response object (typically called
res); - the next function in the middleware chain (see below; typically called
next).
We write our middleware function and then use() it from our Express application object.
Here is a simple example of a middleware that will run on any request. This will simply log the time of any request. Note that new Date() creates a date object representing the current time and toLocaleString() formats the date using the convention for the locale (language/country combination) that the server is configured for.
Note how use() expects a function which takes request and response as parameters, the same as the route handlers, as well as next. This example writes a message to the console informing the user of the time of the request.
Notice the call to the next(); function (also passed as a parameter to use()). This calls the next function in the middleware chain. What do we mean by this? It is important to note that we can specify multiple items of middleware via multiple use() calls. Each item of middleware is called in the order it is specified, as long as next() is called from the previous item. So, if another middleware function is specified after this one, it will be called with next(). If there is no middleware after this one, the route handler itself will be called with next().
The diagram below shows how the request can pass through multiple items of middleware before reaching the route handler:
Middleware with specific routes
We can use routes to specify that a given middleware will only run before handling a particular route. This can be useful as, we might want certain middleware to only run in response to certain requests. We do this by supplying an optional first argument to use() to specify which routes will run this middleware. For example, the middleware below (showing the time of the request once again) will only run with a route of search followed by a search term:
Middleware with specific HTTP methods
Furthermore, we can specify that middleware will only run for specific HTTP methods (GET, POST, DELETE, etc). We do this by replacing use() with a function representing the HTTP method (get(), post() etc). A good real-world use of this would be to prevent access to routes which modify data (POST, DELETE, PUT) unless you're logged in. For example:
Using multiple middleware with one statement
You can use multiple items of middleware in one use(), get() or post() call. You specify each middleware function as a successive parameter, so that the syntax is:
So, for example:
In this example, all requests to /testroute will be intercepted by both specified middleware functions, and both messages will be displayed on the console, in order (the first specified function will run first).
Using middleware to prevent access to a route under certain conditions
As implied in the previous section, you can use middleware to prevent the route ever being called under certain conditions. A good example would be to implement a check that the user is logged in before they can access certain sensitive routes. You can prevent access to given routes by only calling next() if a certain condition is met, otherwise you send back a response (from the middleware) indicating that the main route cannot be processed. So here is an example which tests for the existence of the username session variable before allowing access to any POST or DELETE route.
To explain this:
- The first thing we do is check whether the method of the request (
req.method) is contained within the array["POST", "DELETE"], i.e. we check whether the method is eitherPOSTorDELETE. We useindexOf()to do this, which returns the position of an element within an array, or -1 if it is not in the array. - So
indexOf()will return 0 forPOST, 1 forDELETEor -1 for any other method (such asGET). - So, if the value is -1 (the method is not
POSTorDELETE), we just callnext()to forward the user on to the route without checking if they're logged in. Otherwise, we check whetherreq.session.usernameexists (i.e. whether the user is logged in) and either callnext()(if it does exist) or return a 401 Unauthorized error and appropriate error message (if it does not).
How is the session data stored in the database?
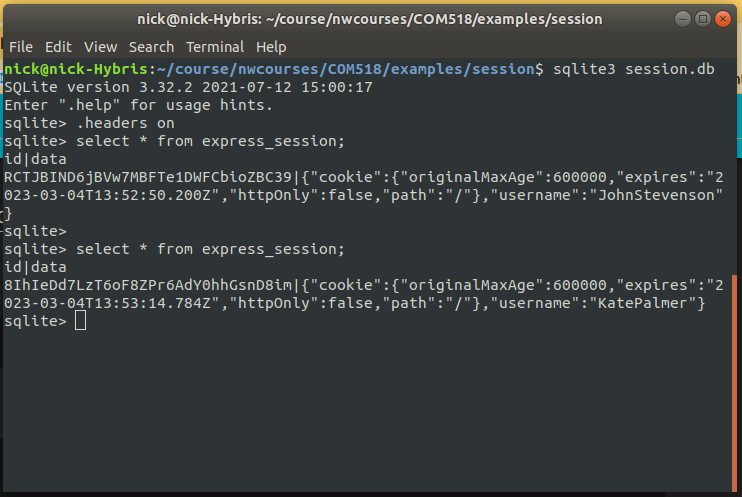
Above is an example of a session store. Two users had logged in to the system (John Stevenson and Kate Palmer) and for each, a session was created and stored in the express_session table. The screenshot above shows the express_session table being queried twice (from the SQLite command-line client), once after John Stevenson logged in and again after Kate Palmer logged in. When a user logs in, their username is stored in a session variable (see below). Note how, as a result, each user has an entry in the express_session table. The table has two columns:
id: the session ID, anddata: data about the session, stored as JSON, including information about the cookie and its expiry date, and the session variables themselves. Sousernamethe JSON corresponds to the session variablereq.session.username
Exercise
The instructions below assume you are using React - this is recommended if you are reasonably happy with React, as the code is cleaner. If you want to use the DOM instead, feel free to do so. If you use the DOM, you will need to include different divs for the login form and "Logged in as..." message/Logout button within your page, and show or hide them as appropriate. You can set the display property of the element's CSS to either block or none to do this.
On GitHub, fork this starter project:
and clone your fork. You will work on this version of the HitTastic! application.
- Add code to initialise
express-sessionandexpress-session-better-sqlite3on your Express server, as shown above. This should go near the top of the server source code. - Add the three routes in the example above (
/loginGET,/loginPOST and/logout), as well as the session-checking middleware shown above, to your Express server.
You should make one important change: the
/loginPOST route should check whether the username and password are contained within theht_userstable, rather than just checking for a hard-coded username and password. To do this, perform your query using theget()method of the prepared statement and then check that the result is not null.This code will also return the username as JSON back to the client if the login was successful, which will allow the client to display a
Logged in as ...message.
- Run through this process in RESTer or REST Tester (see topic 2) (Thunder Client appears to have issues with this exercise so is not recommended) to check that it all works:
- Send a POST request to your
/loginroute with an appropriate username and password from theht_userstable. Look at the HTTP response; you should find that a session cookie is contained within it. - Send a DELETE request to your route which deletes a song with a given ID. It should be successful. Look again at the HTTP response; the session cookie should still be there, and will be there until the session is destroyed.
- Send a POST request to your
/logoutroute. This should log you out; look at the HTTP response again and you should find the session ID is no longer there. - Send another DELETE request to your delete song route. You should now be unable to do so.
- Send a POST request to your
- Now start to add login functionality to the front end. Add a login form to the
Appcomponent (or if you prefer, create a separate component) containing text fields for username and password and a "Login" button. Also add a state variable storing the username, ornullif the user is not logged in. - Modify your code so that, depending on whether the user is logged in or not, you display the login form or a "Logged in as..." message.
- When the button is clicked on the login form, send a request to your
/loginPOST route to log the user in. Check the HTTP code sent back from the server (viaresponse.status). If it's 200, store the currently-logged in user in the state variable. If the status code is not 200, display an error via an alert box and ensure the state variable isnull. - Add a "Logout" button adjacent to the "Logged in as..." message. Add an event handler to the "Logout" button to send a request to the logout route when clicked. When the server returns the response from the
/logoutroute, you should update the username state variable in theAppcomponent tonullto trigger a re-render of the front end, so that the login form is shown again. - In an effect in the main
Appcomponent, send aGETrequest to the/loginroute and examine the response. Update the state variable holding the currently logged-in user to the username in the response (which will be either a real username ornullif the login fails). - Add your React search functionality from Topic 6 and ensure you have done Part C of Topic 6. Modify the "buy" functionality so that if a 401 is returned from the
buyroute, an error message telling the user they're not logged in should appear as an alert box. Test it by trying to buy music before the user is logged in (it should not work) and then after they've logged in (it should work).
Other things to try
- Modify your
buyroute so that the balance of the currently logged-in user is reduced by 0.79 when they buy a song.