Topic 6
Further React
Displaying lists in React
Often in React, you have to loop through an array or list of data, and generate JSX from the array (for example, create an HTML list from the array). The example below shows how to do this:
Here we are performing a mapping to convert an input array into an output array using a transformation defined with an arrow function. See the Mozilla documentation for more.
Here we are mapping an array of modules into an array of <li> list items containing the module. This mapped array is stored in the variable modulesList. We are then returning a <ul> containing the list items from the component.
Note also how each list item has a unique key, equal to the current module. React uses this to keep track of which item in the list is which, if items in the list are modified or deleted. We don't do this here, but nonetheless you should always give items in a rendered list of items a unique key.
Larger Example - Shopping Cart
The next example combines the discussion on state with the discussion on loops and arrays above, to implement a shopping cart by storing an array of items in state.
This is quite a bit more complex.
Note how we:
- Set the state to an empty array
[]. Note that TypeScript cannot infer the type of the array, therefore we have to specify the type with generics when we calluseState(), i.e.useState<Item[]>(). This specifies that the state variable will hold an array of items, i.e. typeItem[]. As an alternative we could initialise the array withnew Array<Item>()rather than[], as we would be explicitly declaring the type. - Implement a method to add an item to the cart,
addItem(). This runs when the user clicks the "add item" button.- In here we make a clone of the cart state object with
structuredClone()(we cannot add directly to an array stored in state, we must make a clone, add to that, and reset the state to the clone). - We then create an object for the new item (
newItem), containing fields for its ID and its name. The former is an auto-incrementing integer, the latter is what the user entered. - We then add the item to the clone of the cart (
items.push(newItem)), before updating the cart variable in the state to the clone (with the new item added) withsetCart().
- In here we make a clone of the cart state object with
- Use the
map()method of cart to convert it to an array of JSX, ready for rendering, as in the last example. Each cart item is converted to an HTML list item (li), containing the item's name.
Components must have a root element
Note that the JSX returned by a component function must have a single root element. Here is an example, note that MappingApp contains a MapComponent and a PointsOfInterestListComponent but also contains a div to contain them both as a root element for this component.
Components containing other components, and sharing state ("lifting state up")
More complex components will contain sub-components. For example, imagine an extended version of the shopping cart in which there are two React components, one for adding a product, and one for showing the list of products.
Why would you want to do this? You might want to use the component containing the product list in another application, where the products are loaded in from the web rather than input by the user, for example. Or you might want the "add product" component to connect to a database and store the tasks in a database, rather than displaying them immediately.
So by separating out the component into smaller, separate components, it makes each component reusable in different situations, and you can use one component without the other. As we discussed in OODD, we are following the principle of low coupling.
What you are probably asking is, however: how can the contents of the first sub-component (to add a product) be passed to the second (the list of products)? The recommended approach (see the React documentation) is to store information that needs to be shared between the two components as state of the parent. This is known as lifting state up (i.e. up to the parent component).
This topic is discussed in the React documentation
Lifting state up - a simple example
We will illustrate this with a simpler example. This example contains three components:
- an
InputComponentto allow the user to input a name; - a
GreetingComponentto show a greeting to the user (using the name input in theInputComponent); - an
Appto manage the application as a whole and to store the state. The name entered in theInputComponentwill be "lifted up" to theApp.
App
InputComponent
GreetingComponent
What is happening here? The diagram gives a general idea:
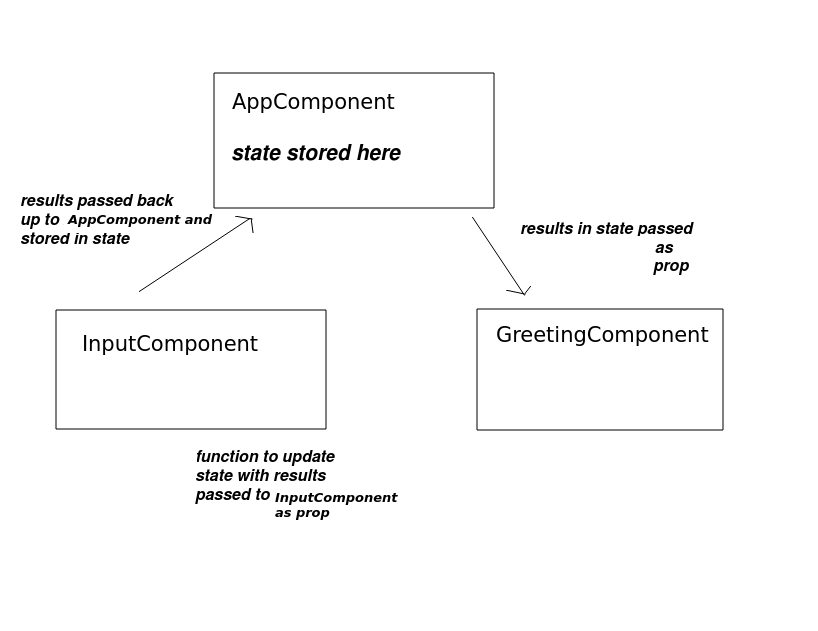
Firstly note the parent component, App. Note that the parent component stores the name in its state. Note how the name state variable is passed down to the sub-component GreetingComponent, as a prop, so it can be used (displayed) by the GreetingComponent. As a result, whenever the name state variable changes, the prop passed to GreetingComponent will also change, and this will cause GreetingComponent to re-render. We say that the name prop of GreetingComponent is tightly bound to the name state variable in App because its value is always the same as the state variable.
What about InputComponent? This reads in the name from the user.
The important thing with InputComponent is that it needs a way to send the name the user entered back up to the App, because that is where the name is being stored in the state. To do this, we pass a reference to the updateStateName() function into the InputComponent, by setting a prop called onNameEntered to the updateStateName function. Thus, onNameEntered is a prop representing a callback function.
When we encounter an onChange event in the InputComponent we call the onNameEntered() callback. Since onNameEntered is equal to the updateStateName() method in App, any change to the name in the text field will update the name state variable of the parent component. Then, since the name prop of the GreetingComponent is tightly bound to the parent's state, any updates in the text field will update the GreetingComponent.
Note also the props type for InputComponent:
There are two props, title (a string) and onNameEntered. This is our callback function, which is passed into the InputComponent as a prop, and will be called when the user enters text into the text field. Note its specific type:
This is somewhat similar to the equivalent type in Kotlin. It specifies that the callback must be a function which takes a string as a parameter and returns nothing (void in TypeScript indicates that the function returns nothing).
Production-ready apps with Vite: creating bundles
Above we saw how we can use Vite as a development server which uses Hot Module Reloading to live-update the app when your code changes. This is very useful while we are developing our app: we can make changes and instantly see the results. We can fix code and quickly see whether the fix worked.
However, when our app is fully debugged and ready to be shipped for production, we can also use Vite as a bundler. You can easily create a bundle by telling Vite to build your application. This is easy, simply run Vite in build mode:
What will this output? It will, by default, create a bundle with a name based on index.js (e.g. index-Db-RNyM6.js) within the dist folder (you do not have to create this folder, Vite will do it for you). Furthermore it will:
- copy your
index.htmland any static assets (such as images) to thedistfolder; - automatically insert a link to the bundle into your
index.html; - and update any references to static assets so that they are loaded from the
distfolder also.
Thus, once you have run a Vite build, your application is fully prepared and ready to go: all you need is to serve it with a server of some kind (e.g. an Express app) and your project is fully runnable. Hopefully you will appreciate that using Vite as a bundle build tool is also a quick, painless and easy experience!
dist is the default output folder, however it can be configured via the build.outDir option in vite.config.mjs. See the documentation. For example:
The above example will generate the output in the built folder instead. Note the syntax when using config options from the documentation. JavaScript syntax is used for defining each option, so build.outDir indicates that you must create an outDir property within a build object.
Using Vite with Express
So far, we have been using CORS to allow a Vite-served front-end to communicate with an Express back-end. However, this requires us to run two servers at once, which is not ideal and a bit messy.
Luckily there is a better solution. The Vite server is designed to be run in what is called middleware mode, in which it can be inserted into another server (such as an Express-based server). Any routes which are not handled by your Express server (i.e. your front end) are then passed on to the Vite dev server running . So you can run your Express server, with Vite added in middleware mode, and continue to take advantage of Vite's Hot Module Reload facilities!
Vite provides a low-level API to do this. You can read about this here. This article is centred around the concept of server-side rendering, which is beyond the scope of this module, but also shows you how you can integrate Vite and Express. However the code is quite low-level and you have to manually handle the processing of index.html. In the words of that page:
If your goal is to create an application, make sure to check out the higher-level SSR plugins and tools at Awesome Vite instead.
Awesome Vite is a GitHub repo which contains a range of third-party tools for working with Vite. A particularly interesting tool is vite-express which integrates Vite with Express. Using vite-express you can create an Express server with the Vite dev server included as middleware with minimal code.
You need to install vite-express first, e.g:
You can then use it in a simple server:
Thus, once you have run a Vite build, your application is fully prepared and ready to go: all you need is to serve it with a server of some kind (e.g. an Express app) and your project is fully runnable. Hopefully you will appreciate that using Vite as a bundle build tool is also a quick, painless and easy experience!
In the assignment, you should use vite-express rather than running two separate servers.
Using vite-express in production
By default vite-express will run Vite in dev server mode. However you can also tell it to serve the static files built using Vite in production mode. To do this, add NODE_ENV=production to your command to run the server, e.g. on Linux:
This will set the NODE_ENV environment variable to the value "production" and this will tell vite-express to serve the static files rather than run a dev server. By default the static files will be served from dist (as this is where Vite places them by default).
On Windows you need to do this:
(note, no space before the && !)
Coding Exercise A - AJAX search with React
Build a version of your HitTastic! AJAX site using React, step-by-step as follows:
- Create a new React/Vite project, separate from the one from last week. Create a
vite-expressserver using the template above, and add the database setup code and routes from the first two weeks into the project. - Start working on your React code. Initially, create a single component with a search box for the artist, and a button, similar to the
InteractiveGreeting3example from last week. - Add another state variable to hold the AJAX search results. This should be an array, as in the shopping cart example above.
- Next, connect the button to an event handler function within the component.
Perform an AJAX request to your Session 1 web API (the search by artist route) and update the results
divto contain the song details, formatted in a user-readable form.- Hint: you will need to use
map()to convert your array of objects to JSX in your component and return it, as shown in the shopping cart example above.
- Hint: you will need to use
- Once it's working under development mode, build your app for production. Look at the contents of the
distfolder and runvite-expressin production mode.
Coding Exercise B - Refactoring your AJAX application with multiple components
- Refactor your React HitTastic! application to use multiple components, so that it lifts up state to the parent. Use a parent component, containing a list of songs as state, and two sub-components: one to allow the user to enter the artist and perform the AJAX request, and another to display all the songs by that artist.
Coding Exercise C (more advanced) - Adding "buy" functionality
- Add a "buy" button to each song and connect this to some code which sends an AJAX POST request to your "buy" route. If the purchase is successful, try live-updating the quantity on the front-end to reflect the new quantity. (How would you do this?)