Topic 4
Modules and Bundlers; Introduction to Web Mapping with OpenStreetMap and Leaflet
This week we will look at how we can manage client-side dependencies and build production apps by looking at JavaScript and TypeScript modules and bundlers. We will also look at web mapping with the Leaflet library, an external libary which provides an example of how we can make use of bundlers.
More on Modules
We have taken a quick look already at modules in Week 1. If you remember, a module is a re-usable piece of JavaScript or TypeScript which can be used by other code. A typical use of a module is to store reusable functions, types or classes.
There are two approaches for implementing modules, CommonJS modules and ECMAScript 6 modules. ECMAScript 6 modules are a web standard, and are increasingly well supported, so we will use ECMAScript 6 modules.
An example ECMAScript 6 module
Here is an example of a simple module.
You'll notice that most of it is simple TypeScript. Only the export statements make it a module. Modules can be used in both Node.js and client-side code..
Note how this module contains two functions, square() and cube(), which calculate the square and the cube of of a number, respectively. However the interesting thing is the export statement at the start of each function declaration.
Using the module from another file
We've created a simple module, but how might we use it from another file? We need to import the functions that have been exported.
Note how we have to import the functions from the module before we can use them. This makes for easier-to-read code as we can tell exactly where the two functions cube() and square() have come from.
Including modules into a web page
This week we will look at how we can manage client-side dependencies and build production apps by looking at JavaScript and TypeScript modules and bundlers. We will also look at web mapping with the Leaflet library, an external libary which provides an example of how we can make use of bundlers.
If you use esnext for the target in tsc, module-compatible modern JavaScript will be output. This can be used directly within a browser, as we have seen.
In a browser, we link a module in the same way as a regular JavaScript file, except we use script type='module'. Note that the main JavaScript file, index.js (compiled from index.ts), is itself a module. It's the 'main module' of the application.
A critical point is that you have to access your site via a web server to use modules. You can use your own Express server for example or you can use the Live Server VS Code extension.
Example 2: Only importing some functions
It's possible to only import some functions from a module. For instance this version of our index.ts code:
This week we will look at how we can manage client-side dependencies and build production apps by looking at JavaScript and TypeScript modules and bundlers. We will also look at web mapping with the Leaflet library, an external libary which provides an example of how we can make use of bundlers.
Example 3: Grouping all members of an exported module into a module object
It can be a little messy to import each function separately. It would be nicer if we could collect together all module exports as a single object when we import them. This approach is frequently used with libraries. This version shows this:
Note how this differs from the first two examples. We are importing everything from the mymaths module into a single object, MyModule. Each exported function or variable will be accessible as properties of this object, e.g. MyModule.square().
Example 4: Default export
As an alternative to the approach in example 3, if your module only needs to export one function or object, you can declare this as the default export. This is another way of achieving the effect of the previous example, with all exports from a module packaged into a single object. However, with a default export, we group everything together as an object when exporting, rather than when importing. So here is an example of the module using a default export:
This exports a default object with three fields: The cube field is set equal to the function _cube() (note that an underscore is a convention in JavaScript for a 'private' or 'internal function), the square field is set equal to the function _square(), and the PI field is set equal to the number 3.141592654.
We can then use the default export in our main module using:
This will import the default export from the module as MyDefaultObject, so we can then call the methods with:
and we can also use the constant PI, as that is included in the exported object:
Web Mapping: Introduction
Websites and smartphone apps which show maps are very common these days. Many such sites use commercial mapping providers such as Google Maps and the like. However, such providers place restrictions on their users and the maps are often generic and do not show information for specialised users such as walkers and cyclists.
OpenStreetMap is a project to produce free, editable maps of the entire world. Users can contribute their own mapping data and the data can be used for free by anyone; see the OpenStreetMap site for more details. Users typically survey a road or path with a GPS device, such as a smartphone, and then draw the road or path on top of their GPS trace using editing software. The fact that the data is free means that developers can use it for their own pruposes, for instance, create their own maps or develop routing applications.
Leaflet is an open-source JavaScript mapping library which offers similar functionality to commercial web mapping services such as Google Maps. It allows you to embed a "slippy" map into a web page. However, unlike these other services, Leaflet can be used to display maps from a whole range of map providers, including, but not restricted to, OpenStreetMap.
Latitude and Longitude
In order to understand location-based applications, it is important to understand the coordinate system used on the earth. The most common coordinate system uses latitude and longitude. Latitude is a measure of how far north or south you are: the equator is at 0 degrees, while the North Pole is at 90 degrees North, we are at about 50 and Spain is at about 40. Longitude is a measure of how far east or west you are: 0 degrees of longitude is referred to as the Prime Meridian (or Greenwich Meridian) and passes through Greenwich, London. By contrast Germany is located between approximately 7 degrees and 15 degrees East, while New York is at 74 degrees West and the west coast of North America at approximately 120 degrees West.
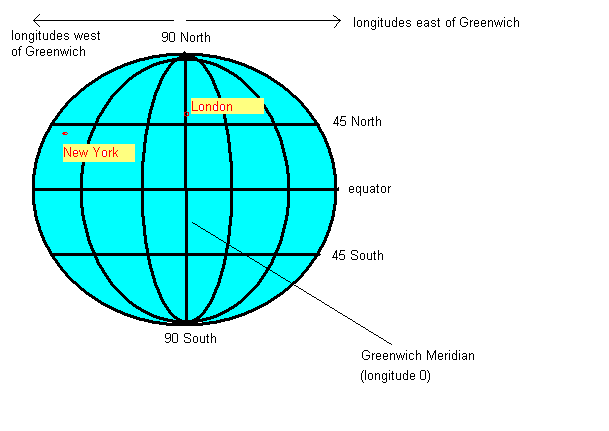
So a given point on the earth can be defined via its latitude and longitude. We are at, approximately, 50.9 North (latitude) and 1.4 West (longitude). By convention, latitudes north of the equator and longitudes east of Greenwich are treated as positive, so we can also define our position as longitude -1.4, latitude +50.9.
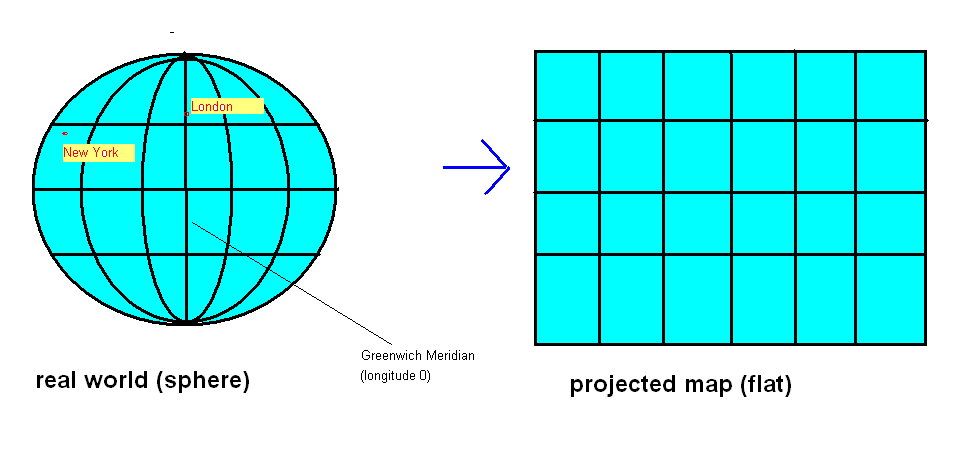
Projections
An important consideration when doing web mapping is that the earth is not flat (it's more or less a sphere) while maps are flat. To display a curved surface on a flat piece of paper or computer screen, we need to do a projection and mathematically transform the latitude and longitude to coordinates suitable for representation on a flat surface. Why is this? Imagine any printed map of the earth. The map is equal width everywhere, from far northern areas such as Greenland or north Norway, to the equator. This does not match reality; since the earth is (more or less) a sphere, the circumference of the earth will be much greater at the equator than those far northern areas - indeed, at the poles, the circumference of the earth is zero!
For this reason, latitude and longitude must be transformed to so called projected coordinates if we want to represent them on a flat surface, such as a computer screen. The details of exactly how this projection is done is out of scope of this unit, but it is something to be aware of if you aim to do more with web mapping. Leaflet makes it easy for us by doing the transformation automatically.
The most common projection used with web mapping is informally referred to as the "Google Projection" (more formally, a type of Spherical Mercator), so called because Google Maps popularised it.
Details on the "Google Projection"
If you are interested, this is how the "Google Projection" works. It consists of a series of zoom levels, with 0 the most zoomed out and successive levels progressively zoomed in. How does this work? Basically, zoom level 0 is defined as a flat map of the entire world, occupying 256x256 pixels, so that 360 degrees of longitude becomes 256 pixels and 180 degrees of latitude becomes 256 pixels, as shown below:
Each successive zoom level zooms in by a factor of 2 in both directions, so that at zoom level 1, there are four 256x256 pixel tiles, each covering a quarter of the earth (N of the equator and W of the Prime Meridian; N of the equator and E of the Prime Meridian; S of the equator and W of the Prime Meridian and S of the equator and E of the Prime Meridian):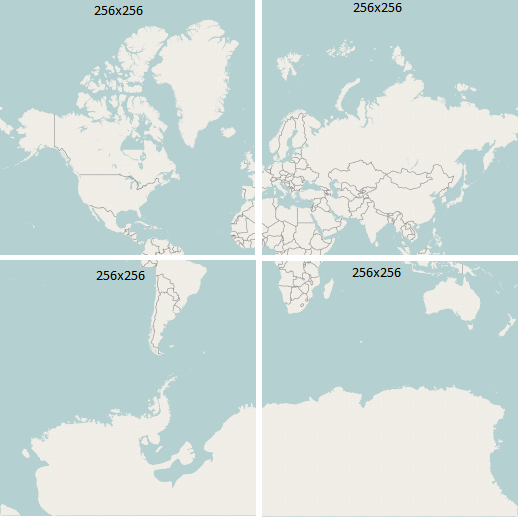
With progressive zoom levels, we continue zooming in by a factor of 2, so that zoom level 2 has 16 tiles (4x4), zoom level 3 has 64 (8x8), and so on. Each tile has an x and y coordinate where x=0 represents the leftmost column of tiles, y=0 represents the topmost row of tiles, and the tile with x=0 y=0 represents the top left tile (x=1 y=0 represents the second tile on the top row, and so on)
Images from OpenStreetMap, (c) OSM contributors, licenced under CC-by-SA (not ODBL as they are old images)
Before looking at Leaflet, we need to take a look at JavaScript (ECMAScript 6) modules as they provide a way of using third-party libraries such as Leaflet from client-side JavaScript code.
Web Mapping with Leaflet
You've already been introduced to npm modules as the standard approach to add dependencies (third-party libraries) to a Node project. npm modules also exist for the client-side. So you can install them with npm, e.g. for Leaflet and its type definitions, we can do:
Your package.json will then look like this:
Hello World in Leaflet
This is a basic example which creates a map. First the HTML:
Then the TypeScript:
Note the following:
- We use
importto import Leaflet. All exported values are grouped in theLobject. - We also link in Leaflet's
CSS. Leaflet uses CSS to position the map tiles correctly and style markers. (How can we import CSS? We will look at this below). - We first create a map object (the variable
map, an object of typeL.Mapcreated with theL.map()method), and associate it withdiv1, defined in our HTML; - Next we set up a map layer. Leaflet maps consist of several layers. This allows us, for instance, to overlay, the locations of points of interest on top of an underlying map. Here, the layer is a
TileLayer, a layer of map tiles. The map tiles come from the servertile.openstreetmap.org. The x, y and z in the URL relate to the "Google" tiling scheme, see above; z is the zoom level. Leaflet will automatically work out the correct values to place in here. - Note how we must include a correct attribution (copyright) message for the map. The example here is the required attribution for OpenStreetMap.
- Having created the layer, we add it to the map (
addTo(map)). - Finally, we set the latitude and longitude of the centre of the map, here latitude=50.908, longitude=-1.4. We pass the latitude and longitude in as an
L.LatLngobject which is returned by theL.latLng()method.- Note how, when we set the centre of the map, we specify the zoom level (see discussion of "Google" tiling scheme, above). 13 and 14 are good ones to start with; try experimenting with different values.
Exercise 1
Try out the above Leaflet example, with the tsconfig.json below, and using a server such as Live Server within VSCode. Does it work?
You will find it fails with the error (look at the Developer Tools in the browser):
This is basically telling you that you need to specify a path for the import, e.g. . for the current directory or .. for the parent directory.
You cannot simply use code such as :
to import the NPM leaflet package for example. The browser is unable to resolve npm packages in this way. Instead, you must use third-party development tools known as build tools to be able to process client-side npm packages in a working application.
Build tools
Build tools typically build your application into a bundle. A bundle is a single source code file containing both your code and the code of any libraries (such as Leaflet) that your app depends on. This can then be shipped with the HTML for your app, so that browsers can load it and have access to all the JavaScript needed to run your application, whether your code or third-party libries. It is typically minified - condensed into a compact, but unreadable, form to minimise its size and thus the time taken to download it.
Using Vite as a development and bundling tool
An increasingly popular - and fast and powerful - build tool for JavaScript is Vite.
Vite contains two different components:
- A development server, which can process imports in your source code which reference third-party Node modules (e.g React) and "live updates" the page if your code changes by rebuilding your page using a technique known as Hot Module Reloading. Essentially, Vite detects if any modules imported by your application have changed, and if so, it reloads them. Third-party module imports (e.g. from NPM - such as our Leaflet import) can be loaded by the development server. See here for details.
- A bundler which is used when the app is fully ready for production. This produces a traditional bundle, as described above, which can be shipped with your app. Under the hood, Vite uses the Rollup bundler.
Using Vite for development is an easy and fast experience. You just create your index.html in your project root, link in your JavaScript or TypeScript source as an ES6 module, and run the Vite development server with vite dev. The server runs on port 5173 so can be accessed via
Then any changes you make will be automatically processed by Vite, your code will be rebuilt, and the page will auto-reload.
You can use the Vite config tool to auto-create an app with dependencies installed and vite.config.mjs setup. However initially we are going to use Vite from first principles just to show how easy it is to setup a Vite dev server, even if we are using React.
Another feature of Vite is that it works very nicely with TypeScript. You can:
- use TypeScript when in development (Hot Module Reloading) mode, without compiling it to JavaScript. So you can edit your TypeScript and see the changes instantly.
- create a bundle directly from your TypeScript. However it will not perform type-checking; you will still need to type-check with
tscbefore doing this.
Exercise 1, continued - Working with Vite
Use Vite to serve the Leaflet hello world app, above. To do this :
- Create a
srcfolder to store your application source code. Move themain.tsinto this folder and modify yourindex.htmlso it linksmain.tsfromsrc. Also modify yourtsconfig.jsonto set the path tomain.tscorrectly within thesrcfolder. - This is all you need! If you start the Vite server in the project folder (or leave it running, if you didn't stop it) your source code will be processed by Vite and accessible on
localhost:5173on the browser, as before. - Now try changing your Leaflet application so that the map is centred on the university (50.9079 North, 1.4015 West) and then New York (40.75 North, 74 West). Note how the HTML will live-update when you change the JavaScript code, due to Hot Module Reloading.
Production-ready apps with Vite: creating bundles
Above we saw how we can use Vite as a development server which uses Hot Module Reloading to live-update the app when your code changes. This is very useful while we are developing our app: we can make changes and instantly see the results. We can fix code and quickly see whether the fix worked.
However, when our app is fully debugged and ready to be shipped for production, we can also use Vite as a bundler. You can easily create a bundle by telling Vite to build your application. This is easy, simply run Vite in build mode:
We will look at producing a built bundle in a future session.
Further features of Leaflet
Adding features
Most web maps have some kind of overlay on the base map, for example a series of markers plotting the locations of pubs, cafes or other points of interest. We can even draw vector shapes (lines, polygons, circles) and add them to the map. This example creates a map and adds a feature to it:
Hopefully this code is obvious. We simply create a marker at the specified position (L.marker takes an array of two members, latitude and longitude), and add it to the map.
Events
In a mapping application, we commonly need to respond to user events, for instance we might want something to happen if the user clicks on the map (such a display a new marker, for instance) or if the user finishes dragging the map to a new location (we might want to load markers from a server, for instance). It is easy to attach events in Leaflet, here is an example:
We use the on() method of the map to attach an event handler to the map. The on() method takes two parameters: the event type and the event handler function. A full list of event types can be found on the Leaflet website.
In the event-handling function itself (an arrow function), we use the event object e to obtain details about the event (in this case, we are interested in the click position). The event object e is automatically passed to the event handler function by the Leaflet library. The event object has a latlng property, representing the position of the mouse click, which is an object of the type L.LatLng. This in turn has two properties, lat and lng representing the actual latitude and longitude.
Popups
One commonly-encountered feature of web mapping is popups, in which the user can click on a marker and be presented with additional information on that feature. These are easy to do in Leaflet: we simply call the bindPopup() method of the feature to attach a popup to that feature. bindPopup() takes one parameter, the text (you can include HTML tags) to appear in the popup. Here is an example. Note how you have to store the marker in a variable so that you can then call bindPopup():
Further reading
Please see here for further reading on mapping, including polygons and lines and styling features.
Exercise 2
- Find the latitude and longitude of your home town and add a marker on your map from Exercise 1 on your home town.
- Combine the marker and mouse click event examples, above, so that by clicking on the map, you add a marker to the map at that position.
- Using a prompt box to read the text in, bind a popup to the marker containing text entered by the user. Use a prompt box to read information in from the user, e.g:
Exercise 3
The database you've been working with contains a table called artists which stores the latitude and longitude of the home towns of selected artists, in addition to the wadsongs.
- Copy your Express server from Week 2 into your Vite project. Add an additional route
/hometown/:artistwhich looks up the hometown of a particular artist. It should return a JSON object containing the hometown name, latitude and longitude, or a 404 if the requested artist cannot be found in theartiststable. Hint: useget()rather thanall()to fetch the results. This will only return one row, rather than an array of rows - ornullif there are no results. - Modify your Leaflet HTML page so that it contains a text field allowing the user to enter an artist, as well as a "Where is this artist from?" button. This should connect to a new client-side function which sends an AJAX request to the
hometownroute on your Express server. As the Express server is running on a different port, you will need to ensure that yourfetch()call includes the full addresshttp://localhost:3000/hometown/plus the artist. Write code to move the map to the latitude and longitude within the object returned from the server.
The same-origin policy and CORS
Your code from Exercise 3 does not work because it violates the same-origin policy for AJAX applications. The front-end is being served by Vite, on port 5173, but the back-end is your Express server on port 3000. The same-origin policy states that the ports of the front and back end must be the same, not just the domain.
The reason for this is security: the ability for an AJAX front end to talk to a third-party server opens up the possibility of exploits by a malicious AJAX-based website while the user is logged onto a legitimate website. Without the same-origin policy, the malicious AJAX front end could potentially make an AJAX connection to the legitimate website (social media, email, banking, etc) and steal personal data by stealing cookies. See the W3C same origin policy document for more detail.
Thus, by default, servers block access to third-party AJAX requests.
CORS
We can solve this using CORS (Cross-Origin Resource Sharing). This adds HTTP headers to a server which allows it to accept AJAX requests from specific, trusted, hosts. Specifically the Access-Control-Allow-Origin header is added:
You need to install the cors NPM package:
import it:
and set up the CORS header:
to allow the front-end on port 5173 to connect to the back-end on port 3000. (There is a better way to work with Vite and Express together, but we will cover it in a future week as there is not enough time this week!)
Exercise 3, continued
Now you have CORS set up correctly, you can continue.
- In the AJAX callback, parse the JSON returned so that a marker is shown on the map for that artist, and the map is centred at the artist's hometown. When the marker is clicked, the name of the home town of the artist should be shown in a popup.
Exercise 4 - adding data to a web API via a map interface
- Add a new route to your server, to add a new home town to the database. The route should take, as POST data, the latitude, longitude, artist name, and home town name.
- In your client-side code, when the user clicks on the map, send a POST request to this route, containing the required information. Use the map click position for the latitude and longitude, and read the artist name and location via prompt boxes, e.g:
- Add a marker to your map when the response is received from the server, and only if a 200 is returned.