Topic 3
Promises, AJAX and DOM
This week we will cover promises, and using AJAX with web APIs.
AJAX - revision
Last year you covered AJAX (Asynchronous JavaScript And XML). You saw that it is an approach to developing highly interactive web applications in which the front-end (JavaScript running client-side in the browser) communicates with a web server in the background, without the page being reloaded. So, with AJAX we can create interactive, instant searches (such as that seen on Google) for example. Your client-side JavaScript code sends a request, and the server sends data back, typically in a pure-data format such as XML or JSON (even though AJAX stands for Asynchronous JavaScript and XML, JSON can also be used). The JSON or XML is then parsed (interpreted) by a second client-side JavaScript function, and the page dynamically updated with the new data.
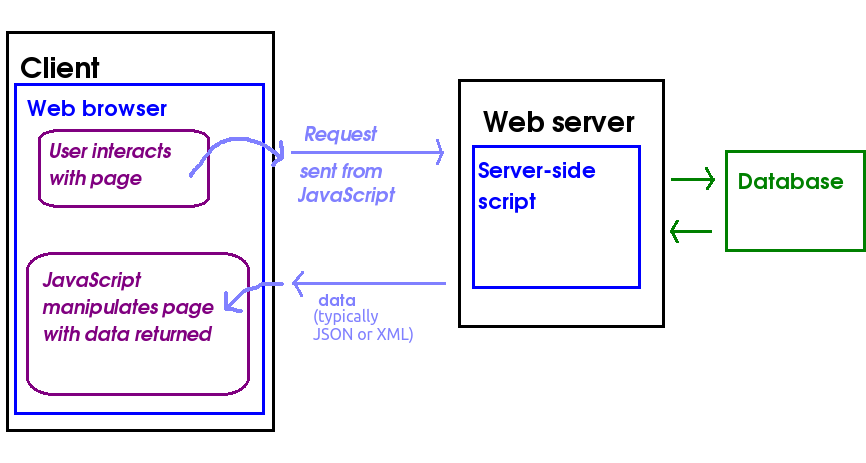
For example, we could have an AJAX application to search for all products of a given type (e.g cornflakes). Our client-side, front-end JavaScript could send a product type input by the user, such as "Cornflakes", to a Node server, and the Node server could send back JSON containing all the cornflakes manufactured by different manufacturers. Then, a second block of JavaScript wouuld receive the JSON from the server, parse (interpret it) and update the HTML front-end with the data provided in the JSON (all brands of cornflakes available).
How might a user interact with an AJAX application? They might enter a search term in a form and click Go, and then the search results would be sent back from the server as JSON in the background, and one small part of the page only (as opposed to the entire page) updated is with the search results. Furthermore,as requests to the server are sent, and responses received, in the background. So the user can continue to interact with the page while waiting for the response to come back.
Promises - Introduction
We will now look at the concept of promises. When using AJAX last year, you will have used the fetch() API and may well remember that you have to either specify a follow-on method to run when the response has been received, with then(), or await its result. So for example:
or:
What is going on here? The fetch call, above, returns a promise object. A promise is an object which "promises" to do a particular (typically) asynchronous, background task which will complete at some point in the future, such as an AJAX request. Typically a function returns a promise immediately, but the task associated with the promise does not finish immediately. The promise will complete at some point in the future, when we say it has been fulfilled or resolved.
If, on the other hand, it fails (e.g. because we can't communicate with the server in this case) we say it has been rejected.
For example, the AJAX fetch() function will return immediately, before the server has sent back a response. It will return a promise, which will be resolved or fulfilled when the server returns a response.
Promises typically resolve with some data. For example, fetch() resolves with the response from the server (an object of type Response).
To handle the promise resolution, you define a function using the promise's then() method, e.g:
Here, doSomeLongRunningTask() returns a promise immediately, but the promise is only fulfilled or resolved at some future point in time. When the promise has been fulfilled, the function passed as an argument to then() will run. Here this is an arrow function which receives the parameter results and then calls processTheResults(), passing it this parameter. The variable results is the value the promise resolves with (which I will call the resolve value). For example, as we saw above, for an AJAX request the resolve value would be the Response object representing the response from the server.
We can simplify the code above to:
and the processTheResults() function will receive, as a parameter, the data that doSomeLongRunningTask() resolves with.
Thus promises allow you to write asynchronous code, by specifying functions that run at some point in the future when some long-running task has completed.
These notes go into promises in more depth, and are recommended for further reading.
AJAX requests using promises with the fetch API - revision
The first few examples will all use this HTML page. They will read in the product type that the user enters, and then use AJAX to request JSON containing details (name, price, manufacturer etc) of that product.
Note that the examples are JavaScript, not TypeScript. However, in class we will create TypeScript examples. This will allow us to examine, in class, some further concepts of TypeScript, but the notes for this will not appear until after the classes have taken place. Please ensure you attend the classes!
Note the use of
This loads the script index.mjs (see below), and specifies that our JavaScript will be treated as an ECMAScript 6 module. As we saw in week 1, modules are a recent JavaScript feature which allows development of reusable client-side JavaScript code; we will look at modules in more detail very soon. From the point of view of this application, making the script a module ensures it is loaded after the page has loaded, which means that document.getElementById() will be able to find the specified elements.
Now we will move on to our client-side JavaScript, index.mjs. The easiest way to communicate with a server using AJAX is the fetch API. Here is an example of the use of the fetch API.
How is this working?
- We fetch a response from the given URL. Here we are contacting a server application which searches for all products of a given type.
- then, when we get the response, we obtain the content (in text format) with
response.text(), i.e. thetext()method of theResponseobject. Note that this method itself returns a promise, which resolves when the text has been extracted from the response - hence we use a furtherthen(). - then, when we have the response in text format (the response is JSON, but we are treating it simply as plain text), we run an arrow function to place the response directly inside a
<div>. This obviously will not be very friendly for the user: the user does not want to see the results in raw JSON format! Later we will examine how to parse the JSON to present the data in a more user-friendly way. - Note also the
catch()statement. This will handle promise rejections - for example if we cannot connect to the sever.
fetch api with async/await
Here is how we would rewrite our fetch API code using async/await:
Note how we're doing a whole AJAX procedure using sequential code, even though AJAX is an asynchronous process. The key things are:
- The function
ajaxSearch()is declared asasync, which makes it a special kind of function (anAsyncFunction) allowing us to do async/await; fetch()(which if you remember returns a promise to do an AJAX call) is preceded byawait. Whatawait()does is suspend execution of the rest of theasyncfunction until the promise concerned has been fulfilled. The argument to the resolve function of the promise is then returned from theawaitcall.- the
response.text()call is also preceded byawait, as it also returns a promise, as we saw above. awaitcalls must be placed in anasyncfunction.
Note also that await will only work with a promise. It's awaiting the successful resolution of that promise. Trying to use await without a promise will not work!
Connecting to a JSON web API with fetch()
The next example will show how we can parse (interpret) JSON returned from a web API, to make the output more user-friendly.
This code is very similar to the text-based example. The main difference is we use response.json() rather than response.text(). This returns a promise which resolves when the JSON in the response has been parsed (compare response.text(), which returns a promise which resolves when we have extracted text from the response).
The other diference is that we need to loop through our array of JSON objects returned from the server. The JSON might look like this:
Hopefully you can see how we loop through each product object within the JSON, and extract the name, manufacturer and price fields from the current object. Notice also how forEach() allows us to loop through each member of an array without needing a for loop with an index. forEach() is a function which performs a second function on each member of an array. Each member of the array in turn is passed into this second function as a parameter.
Developing an AJAX client with TypeScript
This new section has been added following the Week 3 lab session.
If you tried the above AJAX code in TypeScript, you would encounter various errors as TypeScript enforces stronger typing.
Firstly this error:

Note how tsc and VS Code give the error Object is possibly null. Why is this?
document.getElementById()'s return type, as shown above, is HTMLElement | null. This means that null may be returned, and we are trying to call a method on a possibly-null object.
To handle this we can use the non-null assertion operator ! to indicate we know, in our case, that this element will never be null:

The next error is similar:

However, if we similarly fix it, we get another error:

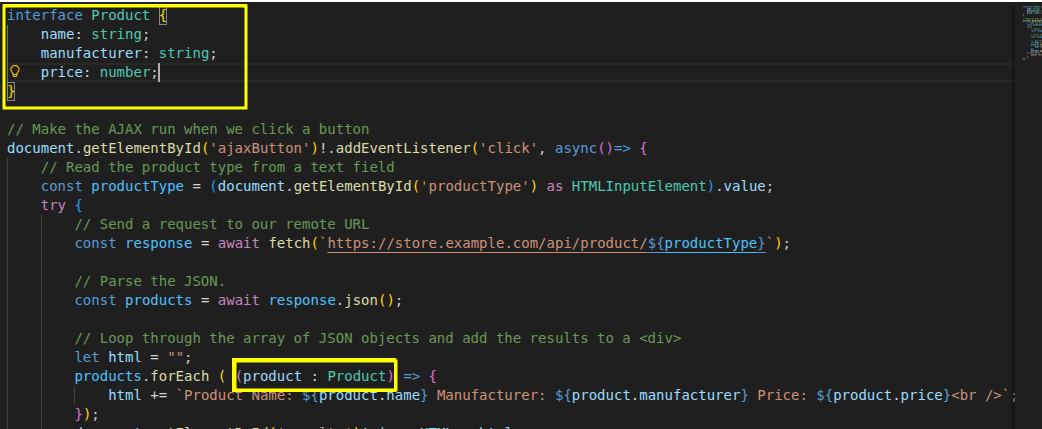
This error states that the property named value does not exist on HTMLElement. What does this mean? getElementById() returns either an HTMLElement object or null, as we have seen. HTMLElement is a generalised type representing any HTML element, whether it be a div, an image, a text field, or anything else. However, value is specific to objects of type HTMLInputElement, i.e. input elements such as text fields. Thus it cannot be used on a plain HTMLElement without casting it to an HTMLInputElement with as (similar to Kotlin), as shown below:

The final type of error is this:

This error, Parameter 'product' implicitly has an 'any' type, arises because we have not declared the type of the parameter product within the forEach arrow function when looping through the products. This is an error because TypeScript cannot figure out what type this parameter is, so we need to declare it. "Implicit any" mean that the implicit type of this parameter is any, meaning any type is possible - but we have not declared this explicitly, which is not allowed. We can solve it as follows:
- Explicitly declare the parameter as
any. This means it could be any type of data. However this leads to weakly-typed code, negating the advantages of TypeScript. - Give it a type representing the data that
productactually holds.productwill hold the current product from the JSON, therefore we need to define a custom type - an interface - with fields matching the fields within the JSON returned from the server:
Serving static web pages with Express
These AJAX examples have involved front-end, client-side content, i.e. an HTML page and client-side JavaScript code. How can we get an Express application to serve this content?
You can make Express serve any such static web content (e.g. HTML pages, images, etc) through the use of the express.static() method, which takes a folder containing the static resources as an argument. A common convention is to place static resources inside a folder called public. So, to make the static resources available via the Express application, you would include the call:
after initialising your Express app. Once you have done this, you can place any static content inside the
public folder and the Express server will send it back if it is requested. For example if you have a index.html page inside public, you will be able to request it with (on your local machine)
Testing the HTTP status code from AJAX
It is easy to test the HTTP status code from a web service client. If you are using AJAX you can simply use the status property of the response object. For example, this code will test for a 404:
Sending POST requests from AJAX
To send POST requests from AJAX, you need to create a POST request from the fetch API and specify the data you want to send and the Content-Type header, much like you do in RESTer. Here is a code snippet which will send a POST request to a /newproduct endpoint:
Note how we send a fetch() request to the given URL, but this time, we have to specify a number of options in a JavaScript object as a second argument to the fetch() function. These are:
- the HTTP method (POST here);
- the HTTP headers we want to add to the request. This is itself a JavaScript object containing a series of property/value pairs, the properties being the header name and the value, its value. So here, we are setting the
Content-Typeheader toapplication/json. - The request body. This is a JSON string representing the data we want to send. Note that here, we create the JSON by specifying a JavaScript object
product, containing product details, and then convert it to a JSON string withJSON.stringify().
In this example, the HTTP request sent by the code will look something like this:
Note how we specify the Content-Type in the request as an HTTP header, just like in the response. Also note how the JSON data is embedded within the request body, with a blank line separating the headers and the body, just as for the request. The Content-Type tells the server to expect JSON.
Introduction to querying and Manipulating HTML documents using the DOM
So far we have looked at how to parse JSON returned from web APIs, and populate the front end with the data contained within the JSON. We have also looked at how to send POST requests to the server via AJAX. However, we can build more sophisticated front-end applications using other techniques. Later in the module you will be introduced to the React framework for front-end development, however this week we will start by taking a look at the underlying mechanism for page manipulation, the Document Object Model (DOM).
Previously you've seen the innerHTML property which can be used to read, or change, the text within an HTML element. You've also looked at simple use of the Document Object Model (DOM) to access elements on a web page - specifically the use of getElementById() to access a specific page element using its ID.
However that's just the start: the DOM offers a whole range of ways to read and manipulate HTML pages or XML data. To understand how you can use DOM for document manipulation, you must understand the concept of nodes, which we will discuss below. The examples below use the DOM to manipulate HTML documents, however, more generally, the DOM is used for accessing and manipulating XML documents. An HTML web page is a particular, specific type of XML document. So, as well as using the DOM to query and manipulate web pages, we can use it in a more general sense to query and manipulate XML. In AJAX, this latter use of the DOM is used extensively.
The Concept of Nodes
- Part of the W3C Document Object Model (DOM)
- A systematic way to navigate and manipulate the content of an HTML or XML document, not only the elements, but also the text within them
- An HTML or XML document consists of a series of hierarchical nodes
- Each element (e.g p, div, or em in HTML; or a custom tag in XML) is treated as a node
- However it's not just the elements themselves: the text within each element is also treated as a special kind of node, a text node
- The nodes are a nested, hierarchical structure
- An element within an element is a child node of that element
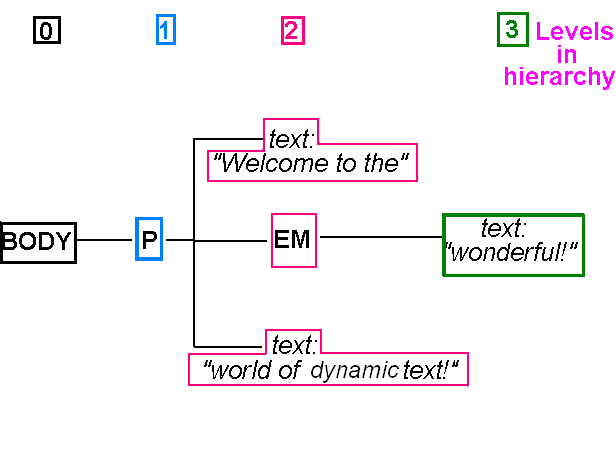
Example of Nodes Terminology
- The paragraph is a child node of the body
- The paragraph contains three of its own child nodes:
- The text: "Welcome to the"
- The em element
- The text: "world of dynamic text!"
- The em itself contains one child node:
- The text: "wonderful!"
- This is a child of the em not the p
Nodes Hierarchy Diagram: Tree view
Key features of the DOM
Adding a new node
document.createElement() allows us to create a brand new element and
document.createTextNode() allows us to create a brand new text node.
Having created an element we can then populate it with text nodes and child elements, and finally add it to either the body of the page, or
Another element, which will act as its parent.
We use the node's appendChild() method to do this.
The HTML is as follows:
The code (TypeScript) is as follows. Note how we:
- create a paragraph with
document.createElement(); - create a text node with
document.createTextNode(); - append the text node to the paragraph using
appendChild(); - append the paragraph to the body, also with
appendChild().
Querying nodes
document.querySelector() and document.querySelectorAll() give the first element, and all elements, which match a CSS selector respectively, eg
will give an array of all elements with a class of important. See Example
HTML of example:
TypeScript:
Note how:
- we first use
document.querySelector()to find thedivwith the selector of#div1and then set it to black background, white text. - we then use
document.querySelectorAll()to find all elements with a class ofimportant(i.e. selector.important). We then loop through all the elements we found, setting the style to red background, white text.
Removing and replacing nodes
We can also remove and replace nodes, using removeChild() and replaceChild() respectively.
removeChild() should be called on a parent node, with a child node (to remove) passed in as a parameter, e.g.:
See here for a replaceChild() example. The signature is:
Data Attributes, Named Event Handler Functions, Getting and Setting Attributes
These notes provide some further material on the DOM, such as how to link all buttons to the same event handler function to improve application efficiency.
Coding Exercises
Your aim is to develop HitTastic!, a website allowing users to search for, and buy, music. You are going to develop a front-end for HitTastic! and connect it to your Node server that you wrote last week.
Use the HTML below as a starting point.
Exercise 1 - AJAX from TypeScript
Place the HTML page above in a
publicfolder, and addapp.use(express.static('public'))- see above - to your Node server from last week. So, for example, if your file ishittastic.htmlyou would access it with a URL similar to:The image can be found at https://nwcourses.github.io/images/hittastic.png.
It should be saved in an
imagessubfolder withinpublic.In a separate file on the front-end,
index.mjs(client side, i.e. save it inpublic, and in JavaScript for now), write an AJAX request function which connects to your/artistAPI endpoint from topic 2. You should parse the JSON returned. Place the results within the<div>. Remember that you can use innerHTML to fill a page element, e.g:- Once you have it working, resave your JavaScript as
index.ts. You are going to convert it to TypeScript. - Add a new
tsconfig.jsoninside yourpublicfolder which is a copy of your originaltsconfig.jsonfrom your main folder. Addindex.tsto thefiles. Also changenoEmittofalse; you are going to be emitting JavaScript so that it can be loaded by the browser (TypeScript cannot be loaded directly by the browser). Furthermore, settargettoesnext(this ensures that the output JavaScript is clean, modern JavaScript) andskipLibChecktotrue(this ensures that library dependencies are not checked iftargetisesnext, which can be problematic as some of them are using older JavaScript).
To run this, type:
The -p public argument to tsc tells it to use the tsconfig.json in public, rather than the current folder.
- Try compiling the TypeScript. It will not work - there will be errors. Read the section on developing an AJAX client with TypeScript to identify and fix the errors.
- Test it out by including the JavaScript that is produced by compiling the TypeScript in your HTML. This is
index.js, notindex.mjs, so ensure you change the link! - On the same HTML page, create a form to allow the user to add a new song. When the user clicks the button on the form, an AJAX POST request should be sent to your "add song" endpoint from Week 2. Do this by adding code to your TypeScript (
index.ts) and compiling again. - Add error-checking to the "add song" route on your Express server so that if any of the POST data is blank ("") it sends back a 400 Bad Request. Adapt the client-side code to test for a 400 HTTP status code and display an error, e.g. via an alert box or in a
<div>, if so.
Exercise 2 - DOM
Do all this in your TypeScript, index.ts, and compile when you have completed each part.
- In the
forEach()which loops through each song returned from the server, comment out your existing code and replace it with code to do the same using the DOM. For each song (i.e. within theforEach):- create a paragraph using
document.createElement(), - and set its
innerHTMLto the details of that song, taken from the JSON. - Then, using
appendChild(), append that paragraph to the results<div>.
- create a paragraph using
- Create a button using the DOM, using
document.createElement()(see above). Specify the text on the button by creating a text node (document.createTextNode()) and appending it to the button as its child. - Using
addEventListener()to add an event handler to the button. The event handler should be an arrow function for now. For example:
- In the button's event handler, send a POST request to the
buyroute on your server. Obtain the ID from the JSON returned from the search. You do not need to pass any POST data as JSON to the route, just add the ID to the URL. - Add the button you have created to your results
<div>usingappendChild()to append it. - Add code to the AJAX front end of the
buyroute, to handle HTTP status codes other than 200. If they occur, display an appropriate message to the user withalert(). - If you get here before the end of the first half of your Week 4 (week of Feb 9th) lab, read the additional notes on data attributes and change the
buyroute handler to be a named function rather than an anonymous function. Handle all "Buy" button clicks with this event handler, and pass the ID through as a data attribute.