Topic 2
REST Web APIs with Node and Express
Revision from last year
Recall from last year that web applications consist of client and server components. In a client-server system, the client sends a request to the server and the server replies with a response, which the client processes:
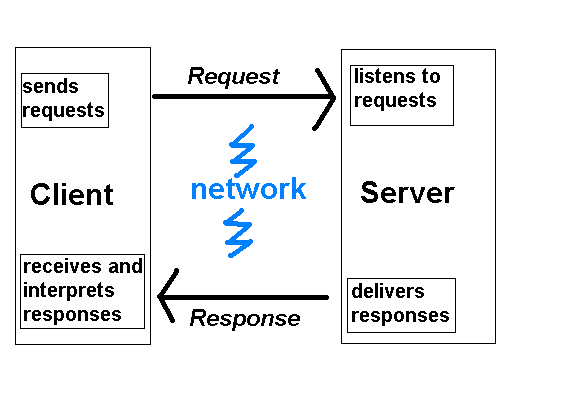
The web browser acts as the client. The web browser processes:
- HTML, representing the site's content;
- CSS (Cascading Style Sheets) defining the look and feel (colours, fonts, layout, etc);
- Client-side JavaScript to perform tasks in response to user events, such as button clicks. An example might be form validation.
Therefore, HTML, CSS and JavaScript event handling all run on the client.
The server component typically runs on a remote machine, and consists of server software (such as a Node.js server) interacting with a database of some kind (such as SQLite or MySQL). If using Node.js we can use a web server framework such as Express (as you did last year) to make it easier to develop a server.
In the case of the web, client/server communication takes place using the Hypertext Transfer Protocol (HTTP). HTTP is a specification for the format of messages exchanged between web clients (such as browsers) and web servers (such as a Node.js server) - it is rather like a simple language. Web clients and servers can understand HTTP messages and act upon them according to their contents. The client component communicates with the server by sending an HTTP request. The HTTP request is an instruction to the server to send back some kind of content (such as HTML or an image). The server processes the HTTP request, acts upon it and sends back an HTTP response containing the requested content:
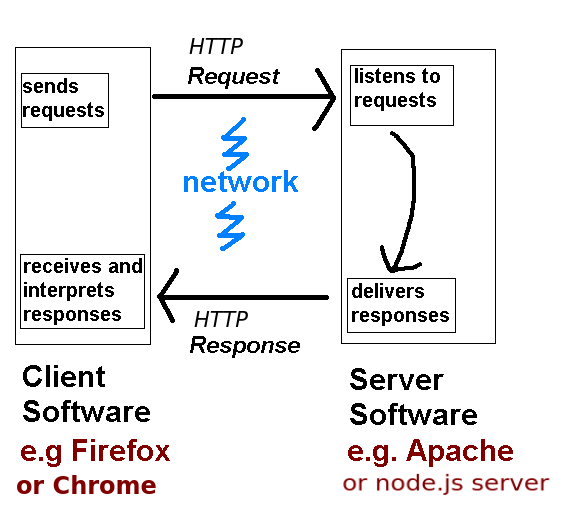
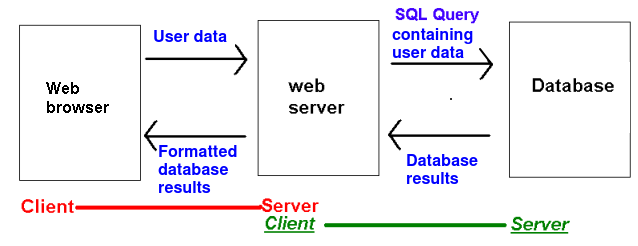
For many tasks the server needs to query a database. For example if the user is searching for a product, the search text is sent to the server within the HTTP request, which then passes it onto the database. The database sends back a list of results and the server formats those results to be sent back to the client as HTML.
HTTP - Hypertext Transfer Protocol - revision
When the user enters the address in their browser e.g.
the browser generates an HTTP request. This is an instruction to the web server to send back the requested page in a format that the web server understands. An HTTP request looks like this:
It can be seen that we are requesting the page about.html from the domain www.example.com. (Potentially one server can host several domains, that is why we need the domain name). The instruction GET is known as the HTTP method; there are various types of HTTP method such as GET, POST, PUT, or DELETE. A request with a method of GET (called a GET request) is used when we are simply looking up a web page, rather than creating or modifying an existing page.
Once the website's server hardware receives the HTTP request, it is processed by the server, such as our Express server. This can be seen in the diagram below:
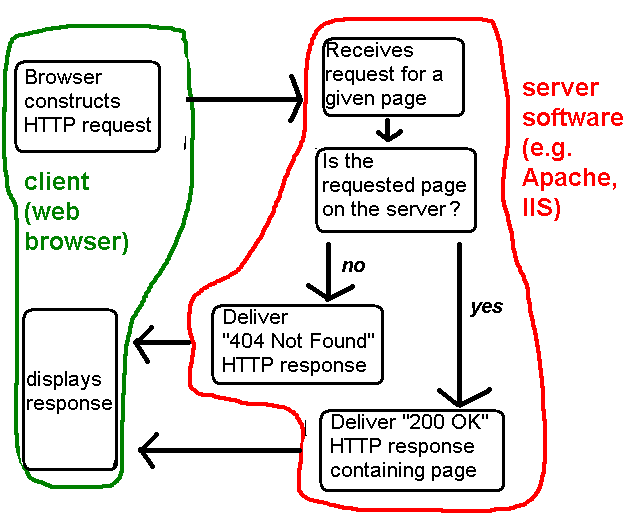
Our express server delivers the appropriate body back as an HTTP response.
The HTTP response
The HTTP response looks like this:
It consists of three parts:
- A status code (200 OK)
- A header, consisting of information about the response
- The response body (the web page itself)
HTTP Response Part 1: Status Code
Status codes indicate to the client whether the request was successful. The status code 200 OK indicates that the request was successful, however there are various error codes to indicate different kinds of error. These include:
- 404 Not Found - the requested page was not on the server;
- 500 Internal Server Error - the web server software encountered some sort of internal error
- 401 Unauthorized - you tried to request a web page which you do not have the rights to view
- 400 Bad Request - the HTTP request was invalid in some way, e.g. contained invalid request data
If the response contains an error code, the browser can act appropriately to handle the error.
HTTP Response Part 2: The header
The HTTP response header consists of information about the response, including:
- The MIME type (Content-Type) - what sort of response is being sent back (HTML, image, PDF file, etc). Example MIME types include
text/html, the MIME type for an HTML page, orimage/jpg, the MIME type for a JPEG image. - The /static length - length of the response
- The date
The client's browser uses the content of the header to determine how to display the content, for example if the browser reads the MIME type as text/html, it will know to interpret the response as an HTML page, whereas if the MIME type is image/jpeg, it will know to interpret the response as a JPEG image.
JSON Web APIs
In this week's topic you will be introduced to the concept of web APIs. You will get an initial idea of why they are useful, and will start to write a simple web API using Node.js and Express.
Think about the work you did last year in Web Technologies, in which you wrote a simple Node/Express server to search a database table and display the results using EJS. You generated HTML as the output format, so that the results look good in a browser.
The problem with HTML, however, is that it is a format specific to a browser. This is fine if we are simply writing a website to be viewed by an end-user in a browser. But the end-user is not the only potential user of the data. Other applications might want to make use of the content, for example an app running on Android or iOS or even a desktop app. Phone apps or desktop apps do not typically use HTML, they use their own user interface, so it would be better if our server delivered the data as raw data, without any presentation or formatting. Raw data would be easier for non-web apps to parse (interpret) compared to HTML.
An example of a raw data format is JSON, which you saw last year in COM419 and is discussed below. Another example is XML. Raw data such as JSON or XML, because it contains the data only, and no presentation or formatting, could then be easily processed by any front end.
A web API, then, is a web application which provides data to other apps in a pure data format such as JSON, as described above, and is accessed via one or more URLs. Web APIs typically query a database and supply the database results to clients in JSON or XML. These clients can be smartphone or desktop apps, but can also be third party websites, run by other organisations, which might want to make use of the web API's data. We will explore this aspect below, in Exercise 3.
JSON - JavaScript Object Notation - Revision
JSON uses JavaScript syntax (hence the name) to represent data as it gets sent across the web. As you saw last year, JavaScript uses curly brackets {} to represent objects (similar to Python dictionaries in the sense that they consist of key/value pairs, though you can also add methods to objects) and square brackets [] to represent arrays. So with JSON we reuse this syntax to represent data, using curly brackets {} to represent a single entity (such as a person, a song or a film) and square brackets [] to represent a collection of entities (i.e. an array of entities).
Here is an example of a JSON object representing a single student.
Note how the JSON object representing the student is defined by curly brackets { and }, and inside the curly bracket, we specify each property of the student (name, username and course) and the corresponding value ("Tim Smith", "2smitt82", and "Computer Studies", respectively). A colon (:) separates the property and the value, and a comma separates each property/value pair.
The next example shows a collection (array) of students. Note how we use the JSON array syntax [ and ] to define the collection, how each individual student object is represented by curly brackets { and }, and how each student object within the array is separated by a comma.
Examples of Web APIs
Examples of web APIs could include:
- A weather web API, providing weather forecasts as JSON which could then be used by other applications.
- An airline web API providing flights (dates, times and prices) as JSON.
- A web API providing the addresses and locations of points of interest, such as shops, restaurants, cafes and so on as JSON.
- A web API providing traffic conditions (locations of delays, etc) as JSON.
These could be used by a range of clients, for example:
- The weather web API could be used by tourist websites for particular cities. The tourist website could send the city name to the weather web API, which could then respond with the forecast for that city as JSON. The tourist website could then extract the data from the JSON and incorporate it within its own interface.
- A weather web API could be used by a weather forecast mobile app.
- The airline web API could be used by "find cheap flights" websites such as Skyscanner. The "cheap flights" website could contact APIs provided by various airlines and extract the flight data from each. It could then process the data from all the airlines and order the flights by price, for example.
- The airline web API could also be used by the airline's own mobile app to allow the user to check flight times. The app could extract the data from the JSON and show it on its own interfaces.
- The points of interest API could be used by a business's website to show the location of that business. Or it could be used by tourist websites to show a map of points of interest in that city. It could also be used by a third-party mobile app to display points of interest near the user.
- The traffic API could be used by any website or app which allows the user to check traffic conditions. For example it could be used by a city's website to show the locations of traffic delays within the city. Or it could be used by a third-party mobile app which allows the user to find traffic delays. Again delays could be shown on a map.
So why can Web APIs not simply return HTML to clients, and then the clients extract the relevant data from the HTML? The key point is that raw data is easier to parse. HTML is not considered a good idea because it contains not only data, but also page structure information (headings, paragraphs, tables etc) which means it's difficult to find the data we want.
If the web API sends back the data, and the data alone, it's easy for clients to work with. If you look again at the examples of JSON, above, hopefully you can appreciate that it's easy to find and use the data we're interested in because JSON concisely represents the data..
REST - Representational State Transfer
Web APIs often make use of Representational State Transfer (REST). What is REST? It is an architecture for web APIs, or a set of recommendations for designing web APIs (a design pattern for web API development, if you like) . The idea centres around using clear, highly-descriptive URLs to represent each real-world entity that our web application needs to deal with (e.g. a song, a list of all songs by a given artist, a flight, a biography of an actor, etc). For example we could have these URLs:
In REST, these URLs are called resources. REST has the following key principles:
- Use of clear, unchanging and descriptive URLs to represent real-world items or entities(as in the example above);
- The URL should produce the data expected of it, e.g https://www.example.com/flight/SA101 should return data representing Solent Airways flight SA101
- The ability to send different instructions to the URL to make it behave in different ways, i.e. we can send a URL one type of instruction to retrieve data and another type to modify data associated with that URL.
- Statelessness
Clean and unchanging URLs
A key principle of REST, illustrated by the examples above, is that of clean, unchanging URLs. Why is this useful? URLs which show the real location on the server's filesystem, or the server-side technology used, are prone to continuous change, for example, if the script is moved to a different directory or we switch server-side scripting technology. This causes problems in bookmarking and linking to such pages, and also, if the URLs represent web APIs, means that developers of client applications have to update their client code to point to the new URL.
With REST, we hide the implementation details with a simple, clean and easily-remembered URL, and define how this URL is mapped to the real, underlying location of the script on the server. For example we could use:
The web server software would convert this REST-style URL to the real, underlying script.
If we changed the underlying URL, i.e. the location of the actual server side script on the server, all we'd need to do is change the mapping of our clean, easily remembered, publicly-visible, "REST-style" URL to the real underlying URL, and clients of the web API could continue to use our web API unchanged with the same publicly-visible URL as before; they wouldn't have to alter their code to reflect the new underlying URL. We could even change the server-side implementation technology (e.g. .NET to Node.js) without having to change the publicly-visible URL: once again we would only have to change the mapping from the publicly-visible URL to the underlying URL.
Furthermore, this allows us to easily swap between dynamically and statically generated data. Imagine the URL below points at a static (i.e. not dynamically generated) JSON file on the server representing all Oasis hits.
By changing the server configuration, we could easily change this URL to point to a server side script which dynamically generates the data from a database. So in summary, REST style URLs provide a clean and unchanging interface to data supplied by our server and there is no need to change the URL depending on how the data associated with that URL is generated.
The practical details of how to actually set up REST-style URLs to point to given scripts will be discussed towards the end of this week's notes.
REST and HTTP
REST adopts the principle of reusing features of HTTP, particularly HTTP methods and status codes, rather than inventing its own protocol. Thus, if you are familiar with HTTP, REST will seem quite natural. With REST, we send different types of messages to the same URL to make it do different things, e.g. retrieve data or change the state of the item represented by the URL. For example if we had the URL:
https://www.example.com/flight/SA101
we could send one type of message (let's call it a "get" message) to to the URL to retrieve the details about flight SA101, and another type of message (let's call it a "put" message) to update the details (e.g. departure time) of flight SA101, and a third type (let's call it a "delete" message) to delete flight SA101.
But what form do these messages take? We could use query string parameters to inform the script of the message type. However, like custom error codes, this could be seen as reinventing the wheel. We can instead use the fundamental HTTP methods, GET, POST, PUT and DELETE.
So for example we could send a GET request to the above URL to retrieve details about flight SA101, a PUT request to modify details of the flight, or a DELETE request to cancel the flight. In general we:
- Use the GET method to retrieve data associated with a URL;
- Use the PUT method to modify data associated with a URL;
- Use the DELETE method to delete data associated with a URL;
- Use the POST method to create a brand new server resource e.g. a new flight.
REST and HTTP status codes
With REST we also use HTTP status codes to signal different types of error, rather than re-inventing the wheel by creating our own set of error codes. For example in a REST API we could send back the following status codes:
- 404 Not Found - if we are trying to search for something which could not be found in the database;
- 400 Bad Request - if the format of the HTTP request was invalid in some way;
- 401 Unauthorized - if the user does not have access to a particular endpoint (e.g. because they have not provided login details);
- 500 Internal Server Error - if an internal error on the server occurs, for example the database server is not running.
REST and statelessness
Another feature of REST is statelessness, which involves not storing application state (known as sessions) on the server but instead passing it between server and client. This makes each API endpoint more loosely-coupled: it does not depend on a previous endpoint which might have stored application state in a session. Many contemporary web applications do this, for example rather than storing the username on the server, authentication is done via tokens which are passed between server and client.
Using Node and Express
In COM419 you have looked at Node.js and Express, but today we will look at how we can use Node and Express to build a Web API.
Using Express in TypeScript
Note that there are two ways of including third-party modules such as Express: CommonJS modules and ECMAScript 6 (ES6) modules.
The latter is the currently-recommended approach and the standards-based approach, and what you used last year in COM419.
However, Express uses CommonJS modules by default which means that we need to take special steps when importing Express into TypeScript.
This is done by setting the esModuleInterop option to true in tsconfig.json. This option, when set, processes CommonJS modules as if they were ES6 modules. For example:
You need to install Express with npm:
When using TypeScript, you also need to install the type definitions for a particular package. These are definitions of the types a particular package uses, and are used by tsc as well as IDEs (such as VS Code) to check you are using the package correctly.
These are provided by the repository Definitely Typed and are subpackages of the namespace @types. So for example Express has a corresponding @types/express package.
So you should install this:
Revision: Hello World with Express
Here is a Hello World server app in Express.
We import the express module, then create an Express app object with express().
With Express, we set up routes. A route is a combination of a particular URL and a handler function for that URL. The URLs for a particular API are called API endpoints. So a route can be described as a handler for a particular endpoint, or set of endpoints (we can set up a single route to handle multiple URLs). In this example we are simply handling the top level, 'root' endpoint, so to request it from a browser, we would enter:
without any parameters supplied.
The handler for the endpoint is a function which takes two parameters, req representing the HTTP request and res representing the HTTP response. In this example we call the send() method of the response object to send back Hello World from Express! to the client.
Downloading and using SQLite
Last year you used the SQLite relational database: if you remember, SQLite uses flat files rather than working with a full client-server database system. You can download SQLite here.
SQLite Studio allows you to manage an SQLite database graphically.
Using SQLite from Node.js
We are going to look now at how you can connect to an SQLite database from Node.js. There are various modules available to do the job, including better-sqlite3 which we will use as it is straightforward and, according to its developers, gives better performance than some alternatives. Documentation is available here
To install, use npm as for last week from the command prompt, e.g:
You should also install the types for better-sqlite3:
Here is a simple example. You need to import the Database class from the better-sqlite3 module and then create a Database object using your .db file:
REST Web API Development with Node and Express
Having revised some topics from last year we will now focus on how we can develop REST Web APIs with Node and Express. As we saw above, Web APIs are in fact very similar to standard web applications - but they deliver a pure data format, such as JSON, back to the client.
Individual routes within a Web API are known as API endpoints. So we could have one API endpoint for looking up all songs by a particular artist, one API endpoint for buying a song, one API endpoint for adding a new song, and so on.
Writing API endpoints which communicate with SQLite using the better-sqlite3 module
We will now go through a series of example API endpoints using various methods, and which communicate with an SQLite database. You have already worked with SQLite databases from Node and Express. This year we are using a different module, better-sqlite3, but the style of code is similar.
SELECT
The code below is a snippet of code showing an API endpoint as part of an Express REST Web API. It perfoms an SQL statement to find all students with the last name matching the lastname parameter to the Express route, so that for example:
would find all students with the last name Smith.
We first create a prepared statement using the prepare() method of our database object. A prepared statement is a statement which has parameters bound to it, and then is compiled into a binary form which can be stored in memory and rapidly executed by the database. The advantage of a prepared statement is that once compiled, it can be rapidly executed again and again by the database if our application performs the same query multiple times. Prepared statements also prevent a certain type of security exploit known as SQL injection, in which a database can be compromised by the user entering fragments of SQL into a form which combine with existing SQL statements in the Node code. We will look at SQL injection in more detail later in the module.
Note how the SQL contains placeholders for bound parameters, using question marks ? We bind data to each placeholder when we execute the statement. To execute a SELECT statement we use the all() method of our prepared statement object, and pass the bound parameters as arguments. So here:
will bind the lastname parameter of the route to the first placeholder. The result will be that we query the database for all students with that last name.
The all() method returns an array of all matching rows from the database, as an array of JavaScript objects. We send back that array as JSON, using res.json().
Note also the use of a try/catch block. This is known as exception handling. Basically we are trying to do something, and if it fails, we catch the error (exception) in the catch block. So, if there was an error, we send back a JSON object containing an error property with a value of the error that occurred, and also send back an HTTP status code of 500 (Internal Server Error) which, by convention, is used if the server encountered an internal error which was not caused by a user mistake.
This version returns all students in the database. Note that in this case, we don't need to specify a parameter to the the query, so stmt.all() takes no arguments.
INSERT
The following is an example of a route to handle an API endpoint which adds a new student to the database using an INSERT statement:
Note how we use app.post() rather than app.get(). In HTTP, requests have a method which states, in general term, what the effect will be when the server acts on the request. Requests with a GET method (GET requests) tell the server to return something (such as database results) while requests with a POST method (POST requests) tell the server to create something (such as a new record in the database).
Here, we are writing a route to create a student, so it makes sense to use a POST request. It performs an INSERT statement using data from the HTTP request's body, i.e. req.body. To execute a statement which changes the database (such as INSERT) we use stmt.run() rather than stmt.all(). This returns an info object containing information about the results of the INSERT statement. Here, we are using info's lastInsertRowid property to get hold of the ID allocated to the new record.
Sending data to the server via the request body
With POST requests, we often need to send data to the server, for example when creating a new product in a products database for a shop, we might need to send the name, manufacturer and price. This is done by embedding the data in the request body, often as JSON, but also as key-value pairs. Last week we considered HTTP requests. Let's see an example of an HTTP POST request with embedded data:
Note how we are sending POST data to /product/create and note how the HTTP request has a Content-Type of application/json (we covered MIME types last week). This is now telling the server (not the client) that what is being sent is JSON.
Note also how the request body begins after the headers, with a gap of one line. Note here, how the request body contains a JSON object containing details of a product.
How can we read the request body from an Express application?
First you must tell Express to read JSON data from the request body with:
The following is an example of a route to handle an API endpoint which adds a new student to the database using an INSERT statement:
Note how we use app.post() rather than app.get(). In HTTP, requests have a method which states, in general term, what the effect will be when the server acts on the request. Requests with a GET method (GET requests) tell the server to return something (such as database results) while requests with a POST method (POST requests) tell the server to create something (such as a new record in the database).
Here, we are writing a route to create a student, so it makes sense to use a POST request. It performs an INSERT statement using data from the HTTP request's body, i.e. req.body. To execute a statement which changes the database (such as INSERT) we use stmt.run() rather than stmt.all(). This returns an info object containing information about the results of the INSERT statement. Here, we are using info's lastInsertRowid property to get hold of the ID allocated to the new record.
PUT requests - updating data
When you are sending data to the server through the request body which is intended to update a record, you should, according to the principles of REST, use a PUT request. PUT requests work in a very similar way to POST requests: data is read from the request body and then used to update data. For example, this is a PUT endpoint which can be used to update a student's name and course:
Note that we use run(), rather than all(), with a statement which updates the database. We use a try/catch block, as for the SELECT example. Also, we check the changes property of the info object returned from the query. This contains the number of rows affected by the SQL statement. If one row was updated, we send back a JSON success message. If not, the reason will be that there is no product with that ID. By convention, following the principles of REST, if we cannot find what we are looking for in a route, we send back the HTTP status code 404 (Not Found).
DELETE - used for DELETE operations
DELETE is similar to UPDATE. As we saw above, a route which results in the deletion of data makes use of the HTTP DELETE method. Note that with DELETE we need not send data through the request body: we can simply include the details of the entity to delete within the URL (for example, the product ID in the example below).
Note how again we check the changes property of the results to check whether it found the record to delete. Note also how the DELETE route takes in the ID as a parameter.
Testing HTTP request methods other than GET
One question remains. How can you test out these methods? With GET methods, it's simple; you simply request the desired API endpoint in your browser and the appropriate route will be executed. However, with other methods, such as POST and DELETE, it's more difficult, as browsers always send GET requests when you type in a URL.
Option One - RESTer
There are various third-party tools which can be used to test out APIs. A particularly useful one is RESTer, which is strongly recommended if using your own computer. However please note this is not available on the university computers and cannot be installed due to the controlled environment. This is a browser extension which allows you to simulate HTTP requests and is available for Chrome and Firefox. To install RESTer, visit either of these links and follow the instructions, and RESTer will be installed to your browser.
RESTer has an interface as shown below:
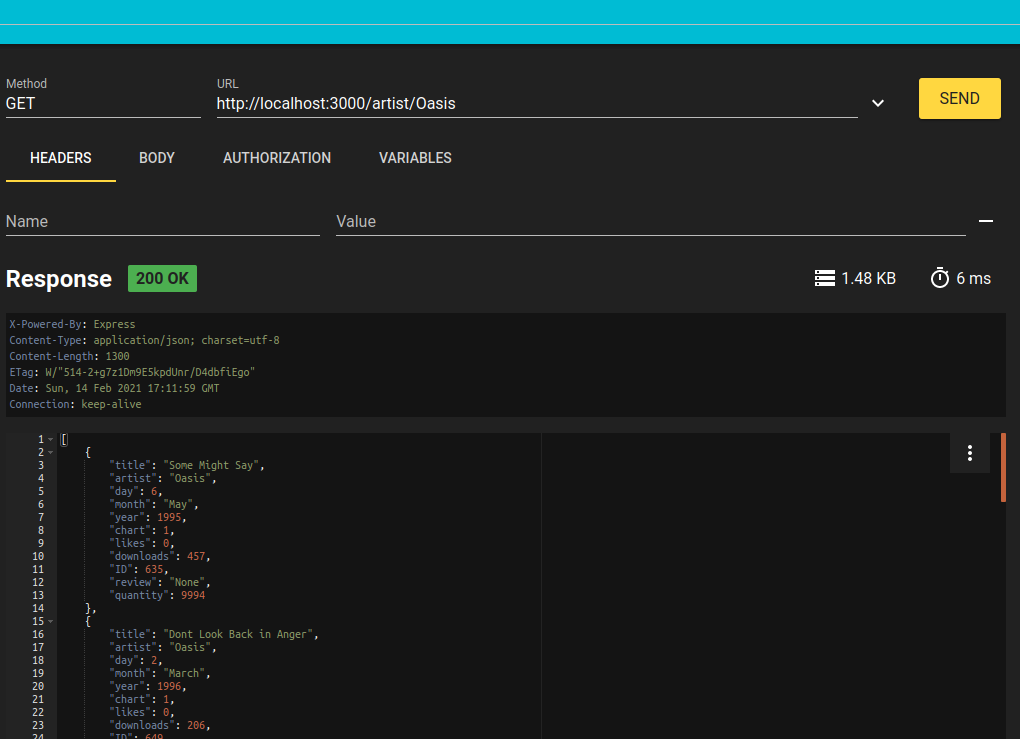
Note how RESTer allows you to specify, amongst other things:
- the HTTP method to use;
- the URL to request;
- the headers and body of the request. (to be covered next week)`
In the example above, a GET request is being made to the URL https://url_of_your_server.example.com/artist/Oasis. Note how the response is shown below the controls, showing the status code, the response headers and the response body.
The screenshot below shows how you can add headers to the HTTP request by selecting the Headers tab. Here we have specified the Content-Type as application/json: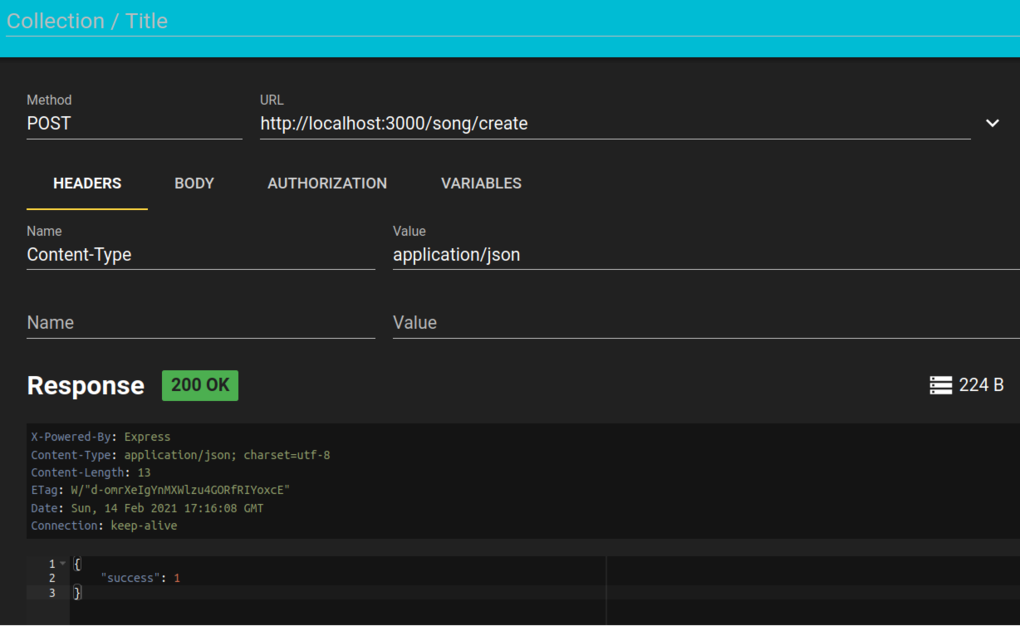
You can also add data to the request body. This is shown below, note how we have added JSON describing a song.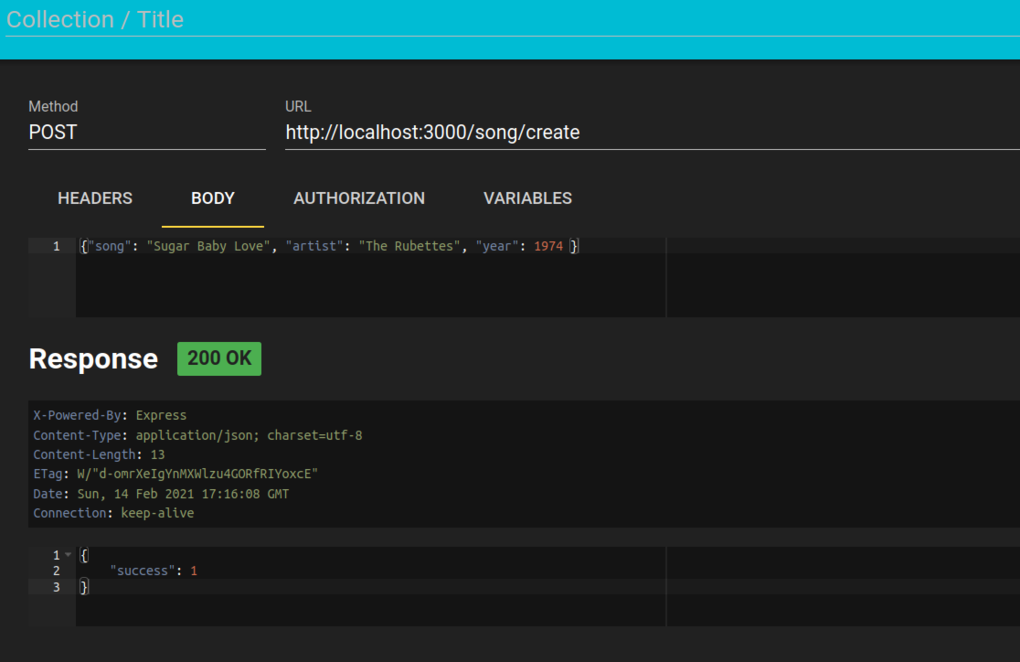
RESTer also allows you to test error conditions: if you supply invalid request data and your web API checks for this, then you will get a non-200 status code returned.
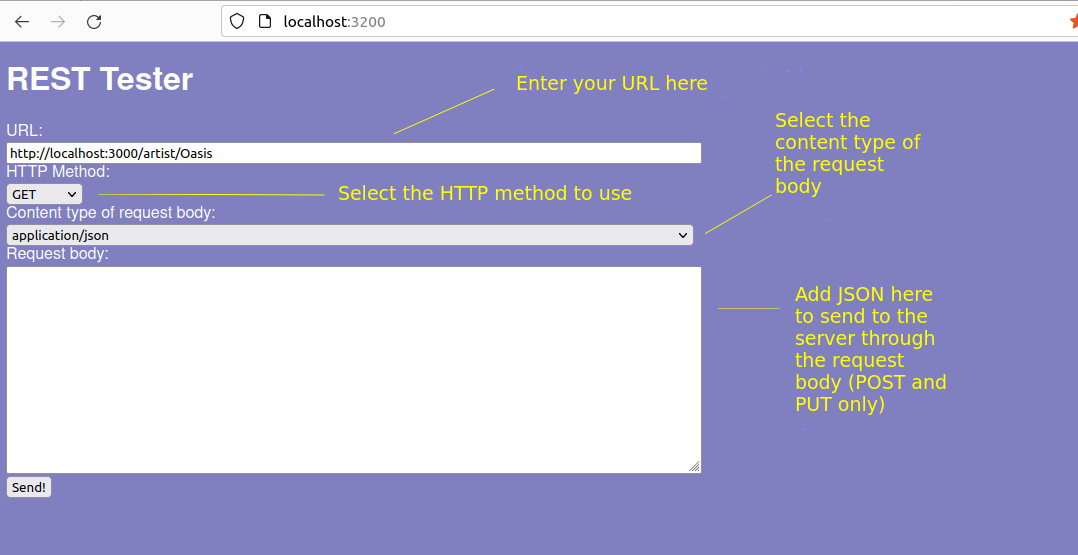
Option Two - REST Tester
If you want to use a very basic standalone tool for the essentials of testing REST APIs, I have created such a tool, called REST Tester. This can be downloaded from GitHub:
Download this, change to its installation folder:
and then install the dependencies:
and run, e.g.:
or use PM2. The application will run on port 3200, so you can access via:
It is shown below:
Coding Exercises
Revision/checking that your environment works: Create the simple Hello World Express example above. Run it, and request it from your browser to show that it works.
Use this db file for your database. Develop a simple REST API in Node and Express with routes to handle these endpoints:
- search for all songs by a given artist (GET);
- search for all songs with a given title (GET);
- search for songs by artist AND title (i.e. both must match) (GET);
- find a song with a given ID (GET). Hint: if you use
get()rather thanall()with your prepared statement, a single row is returned rather than an array of rows.Test the endpoints in the browser.
Extend your server to provide these further endpoints:
- POST: add a song
- PUT: change the price and quantity in stock of a song with a given ID
- DELETE: delete a song with a given ID
- POST: buy a physical copy of song with a given ID by reducing the quantity in stock by 1, and creating an order. You will need to create an
orderstable in the database to hold the song ID and user's desired quantity. In your route, buy the song and create an order; set the quantity to 1 for now.
Test the endpoints in an appropriate tool (RESTer, Thunder Client, REST Tester).