Topic 11
Production Apps; Accessibility
In this final topic we will wrap up the module with a few things we have not had the chance to talk about yet, including these topics:
- Dates and times
- Production Node.js websites
- Type definition files
- Accessibility: a review and refresher
Dates and times
This relatively simple topic may help you in the more advanced tasks in the assignment. To manage dates in JavaScript/TypeScript (both Node.js and client-side) you use the Date object. Here is a simple program making use of it.
Note how we represent dates with a Date object. If no arguments are passed into the Date object, it will represent the current time. If we pass in arguments, such as a date string in the format DDDD-MM-YY hh:mm:ssZ, the Date object will represent a different day (the Z indicates UTC - global standard time - equivalent to GMT, i.e. British winter time). The Date object has various methods such as:
getDay()- the day of the week from 0 (Sunday) to 6 (Saturday)getDate()- the day of the monthgetMonth()- the month, with January 0 and December 11, so you have to add one to give the number most people will be familiar with.getFullYear()- the full year
The code also shows how you can subtract one Date from another, to get the difference between them (in milliseconds). More information on dates can be found the Mozilla site.
Deploying a live Node app
The next topic will cover how to deploy a Node app onto a live server.
Using an industrial-strength web server
There is an important issue to consider when running a Node application on a production server. Node applications typically run on a custom port, such as 3000. However, typical servers on a website (such as Apache) normally run on port 443 if secure (HTTPS) or port 80 for regular non-encrypted HTTP. However, it is not recommended to open non-standard ports to the wider internet, for security reasons - as it makes them vulnerable to exploits.
Furthermore, custom Node apps may not provide facilities for handling large numbers of simultaneous requests, or denial-of-service attacks whereby malicious actors try to take down a website by bombarding it with requests.
Typically, you use an industrial-strength web server to handle incoming requests, and to handle issues of scalability and robustness, rather than deal with these in your own server. Such web servers include Apache or Nginx. These are industry-standard servers and can be installed on a range of operating systems.
Using a reverse proxy to access your app
So, your server does not face the public directly, but lives behind server software such as Apache and Nginx. In that case, how can people access your server?
You need to provide a 'backdoor' means for the outside world to access your server via a server running on the publicly available ports of 80 or 443, such as Apache. A common approach is to use Apache or a similar server as a reverse proxy. A reverse proxy is an intermediate, publicly-visible server which provides access to other private servers run by the same organisation. These private servers might be on different machines, or the same machine (as one machine can run both Apache and a Node server).
The diagram below shows a reverse proxy: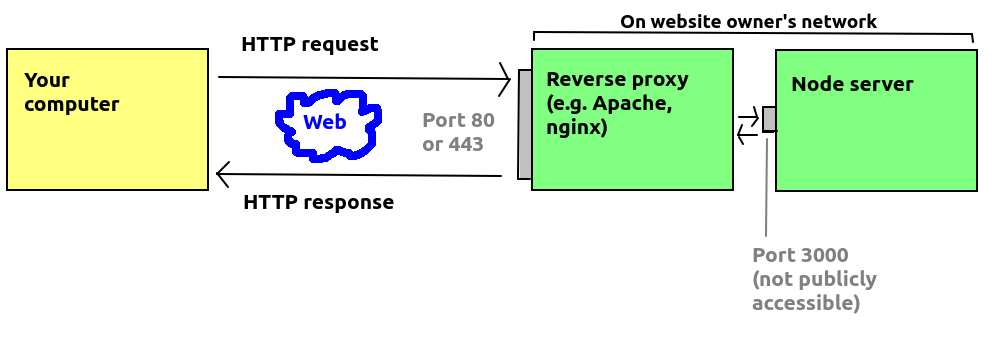
A reverse proxy is different to a "normal" proxy. A "normal" proxy provides access to the wider internet from a particular network. Proxies are often used by organisations to perform security checks on data being sent back from remote servers, so that machines on the organisational network are kept safer. They can also be used to provide caching services, so that for example if many people in an organisation request content from the internet, that content can be cached on the proxy meaning that next time it's requested, it will be requested from the proxy. The university provides a caching proxy, which likely caches your OpenStreetMap map tiles for example, meaning that if you request the same tiles again, they will be served from the proxy rather than from the OpenStreetMap tile server, reducing the load on the OpenStreetMap servers.
The diagram below shows a regular proxy: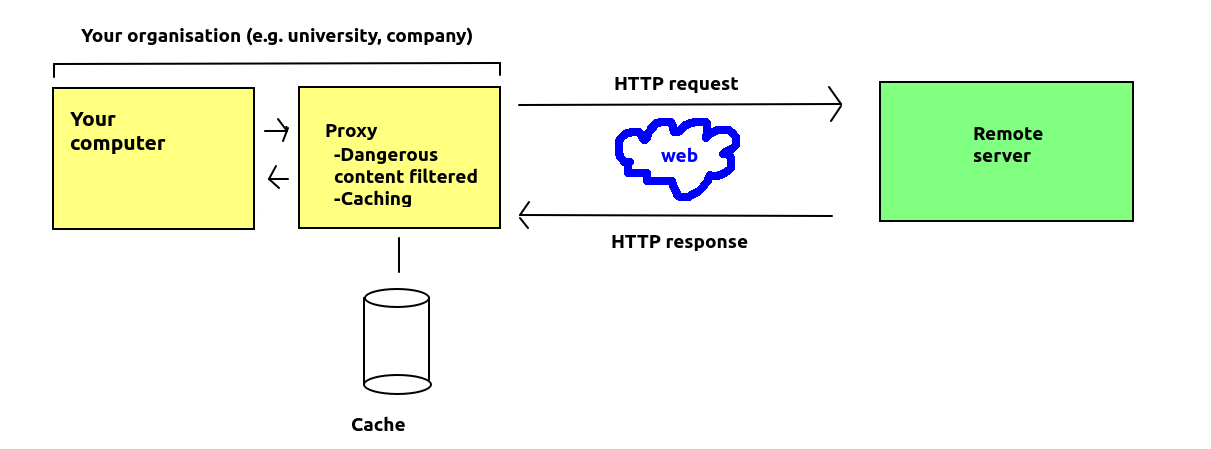
Setting up a reverse proxy
A common server used as a reverse proxy with Node applications is Nginx. DigitalOcean have an article on this: here. Nginx is a lightweight server which is relatively easy to configure, which is why it is often used with Node applications.
With Apache you can set up a proxy using the mod_proxy Apache module (plugin). The steps to do this are as follows. Firstly (from the Linux command line):
enables it. You then need to add some configuration commands to the Apache site configuration file (/etc/apache2/sites-enabled/000-default.conf) on an Ubuntu Linux system.
These four lines should be added to the 000-default.conf site configuration file. What these commands are doing, essentially, are allowing the Apache server to act as a reverse proxy, e.g. if Apache and your Node server are running on myserver.example.com, then a request for http://myserver.example.com/mynodeapp/ will be forwarded to the server running on Port 3000 on that machine.
The last two commands set up cookies correctly, to allow cookies to be shared between the Node server and Apache server.
Once you've done this, you need to restart Apache to reload the configuration file:
TypeScript type definition files - a quick introduction
You will remember that when installing third-party packages, you also needed to install the @types/... type definition packages. As a reminder, many third-party modules are written in JavaScript, not TypeScript, and thus do not come with type-checking available by default. Additionally, even TypeScript packages are typically compiled to a JavaScript bundle, and it is this bundle which is distributed. So how can we perform type-checking with third party libraries? Package authors can provide a type definition file (extension .d.ts) which declares the types as well as functions and methods and the expected parameters and return types.
Here is an example of a JavaScript Cat class:
This would have a corresponding type definition file as follows (assuming it is to be within a package called mytestcatpackage):
Note how we do not include the full implementations of the methods but merely their definitions including parameters, parameter types and return values. These can then be checked by the TypeScript type checker.
You can publish your type definitions to a central repository, DefinitelyTyped, see also GitHub repo. You do this by creating a Git pull request on DefinitelyTyped (see the instructions here). In case you are not aware, you perform a pull request if you want to contribute to someone's repository. You make a fork, make changes and then request the changes are made to the original repo by submitting a pull request on GitHub.
Accessibility - a review / refresher
You should have been introduced to the concept of web accessibility in previous modules. We will review some of the core concepts to ensure they are fresh in your mind.
The concept of accessibility is to make software usable, i.e accessible, to a wide range of users, including those with disabilities in particular. Accessibility also extends to other groups of users, for example those with lower-powered hardware (e.g. less memory or less-powerful graphics hardware).
On the web the principle is to ensure you always build websites which are accessible to as many users as possible.
Accessibility is a large topic and these notes outline some of the most important points, with links to further reading.
Credit: these notes were informed by the Mozilla documentation on accessibility.
Key accessibility principles
One of the most important aspects of accessibility is to ensure that websites can be read in a meaningful way by screen readers - software which uses audio to vocalise, or speak, the contents of a website to allow blind or partially-sighted people to use and interact with the site.
The most well-known accessibility measure is to add alt tags to images to explain their content but there are many others which you should take.
Semantic HTML
The Mozilla article on HTML accessibility provides much information on this topic.
To help a screen reader, you need to ensure that your website is structured in a meaningful way, using semantic HTML. What is semantic HTML? It is HTML which actually conveys the meaning of the content. If the content is explicit, then it can be easily understood by a screen reader which can then vocalise the content in a way which is understood by its users.
What are examples of semantic HTML? Some are long-standing for example the use of a table tag for a table or an img tag for an image.
However there are a wide range of other semantic tags which can help organise our web page into meaningful sections.
These include these block-level elements, which are preferred to generic divs in the cases shown:
header: the header section of a page, including the title, and perhaps a logo and "strapline" summary of the page.footer: the footer section of the page, typically at the bottom, e.g. a copyright message or information about the authors.nav: a navigation section, containing links to other pages on the site.article: an article, e.g. an article for developers or a news story.main: the main content area of the page (separate from thenav,headerorfooter).
Adding semantic content to forms and tables
We can improve the accessibility of forms and tables by adding semantic content to improve their structure.
For forms, you should make the text accompanying a form field a label, e.g:
The label can help with non-screen-reader usage as clicking on it focuses the cursor on the matching form field (the id is used to match) but critically, it makes a semantic link between the text and the input field, which allows the screen reader to explain what the input field is for.
For tables, you should create a well-structured table with a header (thead) and body (tbody). The header should contain th elements (table headings) along with a short explanation (a caption). For example:
What to avoid
Avoid unstructured web pages. These will be vocalised in a confusing manner by screen readers.
Avoid creating "fake" elements with a special role, such as buttons or links, with generic elements such as
divs by styling them to look like buttons. They may look fine for non-screen-reader users but will confuse screen readers who will be unable to vocalise them correctly for their users.If a new tab or window is opened (which in some ways is a poor idea for general usability), always ensure the link specifies that this will happen. Again screen readers will not vocalise this behaviour by default, so you should explicitly state it.
Responsive design
Another important principle of accessibility is ensuring your site is designed responsively, as you learnt in Level 4. This includes making sure the site is still usable if the user changes font size, or if the user switches between portrait and landscape, or if the user wishes to view the site on a mobile device rather than a desktop or laptop.
Using flex layouts and relative measurements for dimensions is a good way of achieving this, and CSS media queries can also help us where flex layout and relative measurements alone cannot accomplish responsiveness to the extent we need.
Do not rely on colour for vital information
To benefit colour-blind users, you should not rely upon colour to emphasise text for example. Far better to use more accessible highlighting such as bold or italic - or if you use colour, use it in conjunction with bold or italic to maximise the number of users who can use your page effectively.
Do not confuse users with "non-standard" appearance
While relying solely on colour isn't a good plan, there are some colours which have become the de-facto standard for certain element roles, and one primary example is the use of blue for links. Users are accustomed to links being blue in colour, so avoid varrying this.
Declutter your UI
Sites need to avoid cognitive overload - overwhelming the user with too much information, which may be difficult for the user to take in. Progressively revealing the site's content when the user follows links or clicks buttons can help present the most vital information first, and further information only when the user needs it.
WAI-ARIA attributes
WAI-ARIA - Web Accessibility Initiative's Accessibility in Rich Internet Applications - provides a series of HTML attributes that can provide accessibility features where standard semantic HTML tags are not possible. For example you can give complex compound elements a role attribute which describes what the element's role is, which can help screen readers vocalise the element in a meaningful way.
WAI-ARIA role attributes can also be used in older browsers which do not support semantic elements such as nav, header, footer etc. However you should always use semantic HTML elements in preference to ARIA attributes where both are available and where your target audience will be using current browsers.
The roles are described on Mozilla. This page clearly describes which roles have a semantic HTML equivalent, and thus are not really necessary except on older browsers. However, some are useful, such as the widget roles. These are typically used in JavaScript-rich applications which feature UI elements (widgets) which are highly interactive and typically require JavaScript to fully implement. The ARIA role can help screen readers make sense of these more complex UI elements. For example there is the combobox role, containing a combo box - a more complex UI element containing a text field and a dropdown list allowing the user to select the value of the text field. There is also a menu role representing a menu.
ARIA attributes can be useful in some other situations too. As explained on the Mozilla page on WAI-ARIA, AJAX applications can provide a particular challenge to screen readers, for example refreshing the contents of a page element when a response is delivered from the server.
For example:
The aria-live property controls the urgency of the content. As discussed in the Mozilla article above, this can be off, polite (only announced if the user is not interacting with the page) and assertive (should be announced as a matter of urgency).
Another useful property is aria-required on form fields which indicate that the form field is required input.
There is also aria-labelledby which can act as an alternative to alt for images when there is a longer description which you might want to also display as part of your main content - see Mozilla article on HTML accessibility. For example:
Web Content Accessibility Guidelines (WCAG)
The W3C has formally specified a series of Web Content Accessibility Guidelines (WCAG) which sites should adhere to. These come in three different levels - A (least strict), AA and AAA (most strict). These can be found on the W3C site and include the guidelines themselves and information on how to adhere to them. Achieving a particular level, such as AA, is often a legal requirement for sites providing a public service (see for example the UK Government site).