Topic 8
Querying SQLite Databases with Room
This week we will look at Android on-board databases by taking a look at SQLite and the Room Persistence API.
Using an SQLite database in Android
- Traditionally, the SQLite API was used to query an SQLite database on Android
- However, this requires a lot of repetitive "boilerplate" code to perform queries
- It is recommended instead to use the Room Persistence Library
- Room is a higher-level API which takes advantage of annotations to allow you to write more concise code
Annotations
- Annotations are a language feature of both Java and Kotlin which allow you to add "meta-code" which is processed before the code is compiled
- Annotations begin with @ followed by an annotation class name
- Annotations are processed either by the compiler or by third-party software
- You have already seen annotations when using Compose (i.e.
@Composable)
Room and annotations
- In the case of Room, annotations are used to allow us to develop more concise code
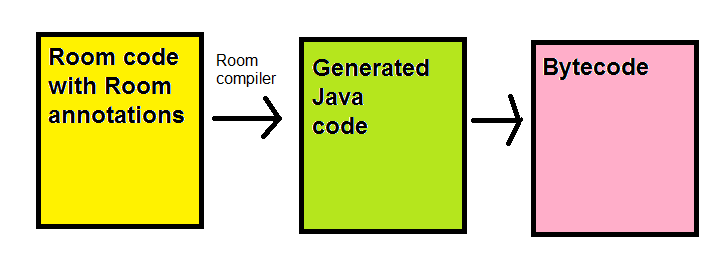
- Room annotations consist of classes which are part of the Room library, and are processed by the Room compiler into standard, albeit long-winded, Java code
- This Java code is then compiled to bytecode in the normal way
The process is shown below:
Using Room
Components of a Room application
A Room application with one database table would contain, as a minimum, these four classes:
- The data entity: class representing your actual data, e.g a Student class to represent a student record in a
studentstable. - The DAO or Data Access Object:
- A class providing access to your database from the rest of your code
- Contains a series of methods which perform given SQL statements
- e.g. a
getById()method which will perform a SELECT statement to retrieve a record using its ID - External code can call the methods of the DAO, and thus can be kept clean and uncluttered by SQL, as all the SQL code is encapsulated within the DAO
- A class representing the actual database as a whole
- Your main activity
The data entity
We'll start with the data entity. As seen above, this is a class representing the entities stored within your database table, e.g.:
This is a simple data class, but has two Room annotations:
@Entity: specifies the database table which will be used to store objects that this class represents@PrimaryKey: specifies which property will coincide with the primary key in the database. Note theautoGenerate = trueargument, which will autogenerate the primary key as the next available integer. The columns in the table will have the same names as the properties (i.e. id, name, course and mark)
We can name the columns differently to the property names in the data class using the annotation @ColumnInfo, e.g:
In this example the columns used in the actual database will be the_name and the_course.
The DAO (Data Access Object)
As we saw above, the DAO encapsulates the SQL queries. Here is an example:
Note how:
- The DAO is an interface, rather than a class: this will be processed by the Room compiler to provide implementations of the methods stated in the interface
- It's marked as a DAO by the
@Daoannotation - We specify a series of queries (using the
@Queryannotation) followexd by methods which will run that query - For example, the
getStudentById()method will execute theSELECT * FROM students WHERE id=:idquery (the:idplaceholder being bound to theidparameter passed into the method) - The
insert()method is marked with the special annotation@Insert. This will take an object of the data class and automatically add it to the database. - As can be seen there are corresponding
@Updateand@Deleteannotations which will take an object and either update or delete the record, respectively - If declared, the update and delete methods will return an int containing the number of affected rows
The database object
Finally, there is the database class.
- Its role is to encapsulate the database as a whole
- It needs to create the database object as a singleton (single instance object, as we saw in OODD), to avoid creating unnecessary multiple copies of the database
- To do this, we use Kotlin companion objects
- A companion object is an object which is attached to a class as a whole, rather than specific instances of a class
Example database
Example database - explanation
- We need to precede the class with the
@Databaseannotation - Our database extends from
RoomDatabase - We have to provide an abstract method to return the DAO
- The outside world, such as our Activity, will call this
- We then begin our companion object
- This contains our single instance of the
StudentDatabaseobject (as we are using the singleton pattern) - Using standard singleton logic, the
getDatabase()method tests if the instance is null; if it is, we create the instance and return it, if it isn't, we simply return it. - This will ensure that there will only ever be one instance of our StudentDatabase
- This contains our single instance of the
- Note how we specify the database name (
studentDatabase) when we create our database object
Our main activity
- Finally, we need a main activity for our application
- This needs to obtain the database (using the
getDatabase()method of the companion object of our database class - Once we have our database, we can obtain the DAO and call its methods
- Note that operations to query the database have to go in a separate, background coroutine so that the user interface doesn't become unresponsive while waiting for the database transactions to take place
Coroutines and Context
Last week we looked at coroutines. One thing we did not examine though was the concept of coroutine context. Each coroutine runs in a context which determines whether the coroutine runs in the foreground or background.
- Typically, each context would run in a separate thread or group of threads.
- In Android, there are three available contexts:
Dispatchers.Main- always runs in the foreground in Android; code which needs to interact with the GUI would go in here. This is the default context.Dispatchers.IO- a background context optimised for input/output operations, for example network communication.Dispatchers.Default- a background context optimised for heavy calculations and processing which does not use input/output. Despite the name, in Android it is not the default context;Dispatchers.Mainis.
- We can switch between contexts and in this way, run some of our code on the main thread and some in the background. When we switch context, the original coroutine suspends, waiting for the code in the other context to complete.
To switch context we use
withContext()and specify a lambda or suspend function which runs in the new context (typically a background context such asDispatchers.IO). While it is running, the original coroutine suspends until the code in the new context has completed.
Main activity - basic example
This is a basic and incomplete example showing how to set up the activity to load the database. It also shows how to query a Room database inside withContext().
Room with ViewModel and LiveData
Room works particularly well with a ViewModel and LiveData.
Updating a Room DAO to return LiveData
It's easy to update a DAO to return LiveData.We simply update our DAO so that the search methods return LiveData of the appropriate type. So, in a student records app, we might change:
to:
This allows other parts of your code to observe changes in the database and auto-update as the database updates.
Using LiveData and a ViewModel with Room
The other thing we can do is to use both LiveData and a ViewModel together with Room. To do this you would return LiveData from the DAO (as above) and store a reference to it in your ViewModel. Then, you can observe the data in the ViewModel with an Observer, as before.
Here is an example of a ViewModel set up to store LiveData from a Room database containing student records:
The ViewModel would then be setup from the MainActivity in the normal way:
and observed in the normal way by observing the getAllStudents() method of the ViewModel:
As shown by the addStudent() method in the ViewModel above, we could also add methods to the ViewModel to perform database operations by launching a coroutine in viewModelScope, rather than lifecycleScope. By doing so, our code would be protected against being terminated early if the device is rotated.
Setting up Room in Android Studio
You need to add the Room dependencies to your project. This is a little more involved than normal as you have to include the Room Compiler, which processes the Room annotations and converts them into regular code. This involves a tool known as KSP.
Setting up the version catalog
First setup your version catalog (libs.versions.toml) as shown below. Note the highlighted sections: these are the Room dependencies.
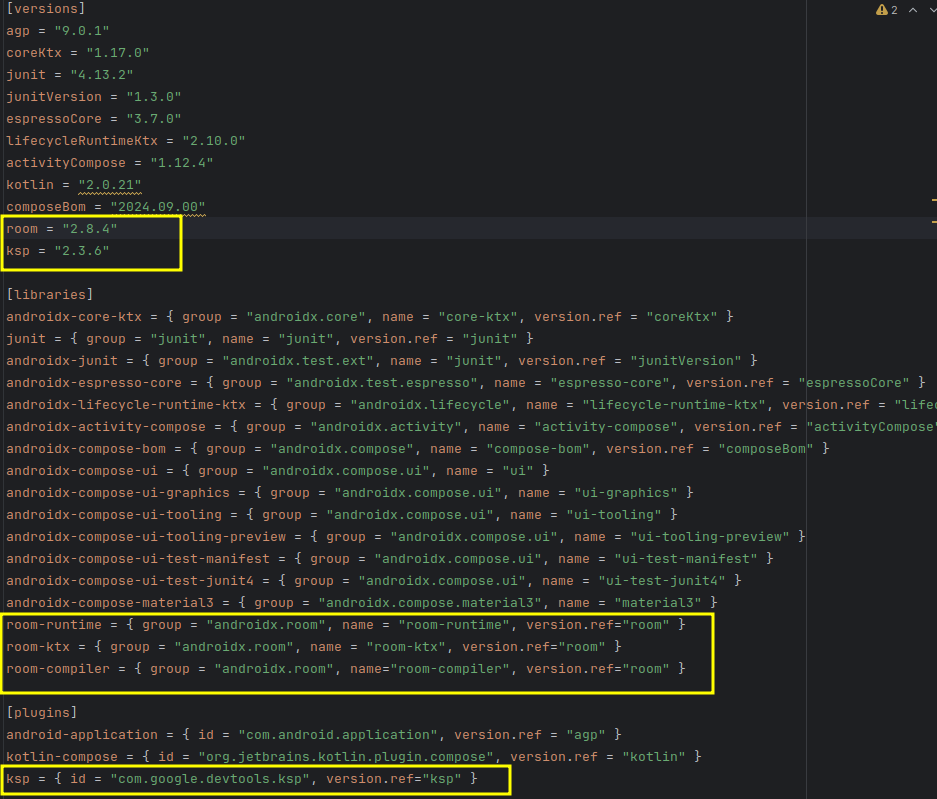
These include the Room version, the KSP version (see below), the Room libraries needed, and the KSP plugin (see below) in the [plugins] section.
KSP
Note the entry in the plugins section. What is this? KSP (Kotlin Symbol Processing) is a tool which will process Java-based annotations in Kotlin code, such as the annotations used by Room. See the documentation.
Using newer KSP
To set up KSP you need to choose an appropriate version. Previously, the KSP version to use was dependent on your version of Kotlin, but this no longer applies. You can use the current version of KSP irrespective of what version of Kotlin you are using. The current version is 2.3.6. This will work on newer Android Studio, Otter upwards but not Narwhal downwards.
Using older versions of KSP
To set up older versions of KSP (on Narwhal downwards) you need to choose an appropriate version which works with your Kotlin compiler.
The version number of older versions is complex: it takes a form such as 2.0.21-1.0.27. The exact version you need to choose depends on the version of the Kotlin compiler on your system. The first number is the Kotlin compiler version and the second number is the KSP version. You need to choose a version which corresponds to your Kotlin compiler version (2.0.21 in this example). To find out the Kotlin version, go to File-Settings-Other Settings-Kotlin Compiler in Android Studio.
Then lookup the KSP versions at the GitHub repository and choose the most recent version which is compatible with your version of Kotlin.
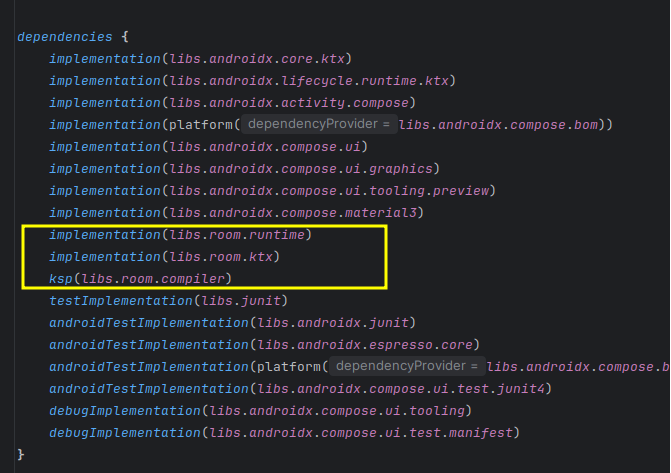
Setting up build.gradle.kts
Having added Room and KSP to your version catalog, you need to then specify the dependencies in your app build.gradle.kts. There are two things you need to do, specify the regular libraries and then specify the KSP plugin. First, the regular libraries:
Then you need to specify the KSP plugin, within the plugins section of your app build.gradle.kts (at the top):

Viewing the database from Android Studio
You can view your database from Android Studio by selecting View-Tool Windows-App Inspection. You have to use a device running at least API 26 to do this. Here is an example: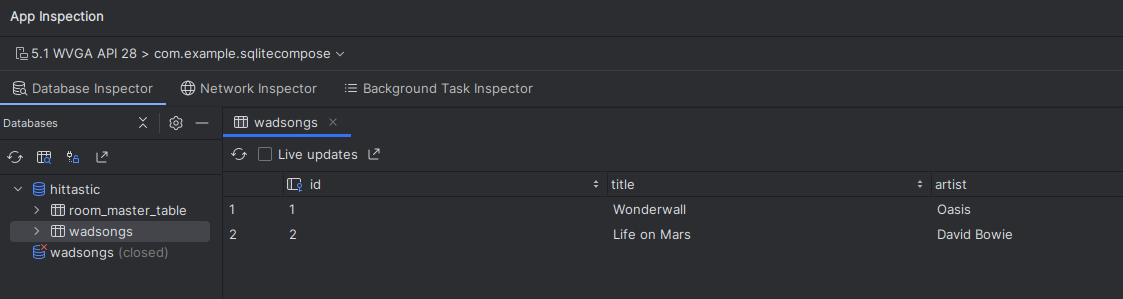
Important - Using KAPT if KSP does not work
For a currently-unknown reason, KSP was not compatible with some configurations of Android Studio one year ago. This may have been resolved by now, but in case not, I have provided instructions for using an alternative. If you obtain obscure errors when using KSP (ensuring you follow the instructions carefully), please use the older KAPT tool instead. To use KAPT instead of KSP:
- Replace the KSP line in the
pluginsin the Appbuild.gradle.ktswith:
as shown below: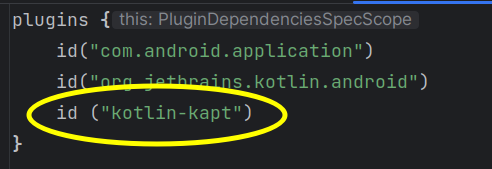
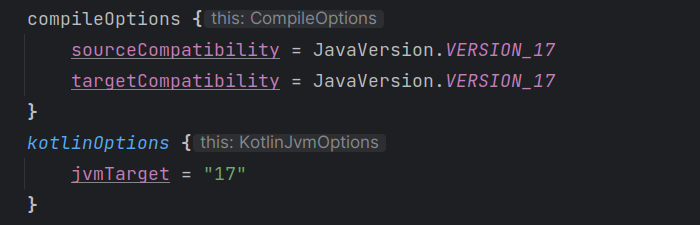
- Change the Java version in
compileOptionsandkotlinOptionsto 17 in the appbuild.gradle.kts, as shown below:
- When including the Room compiler in your dependencies, use
kaptinstead ofksp, e.g:
Exercise
Develop an application to store music in an SQLite database using Room. Use a device running at least API level 26 so you can use the Database Inspector to visualise your database.
The Activity should have a layout with four fields: ID, Title, Artist and Year, with four buttons (Search by ID, Add, Update, Delete). These buttons should have the following effects. Each should call an appropriate method in your DAO. These buttons should perform the following operations:
- Add - add the Title, Artist and Year in the appropriate fields to a "hits" table in an SQLite database. The ID field should be ignored, as the database will allocate an ID. Once added, however, the ID field should be filled in with the allocated ID. (Note that DAO insert methods will return the new ID as a Long as long as it's declared in the method signature - see the example)
Search by ID - find the record with the ID the user entered in the ID field. Display the details of the found song in the other three fields (title, artist, year). An error (a toast is fine) should appear if that song does not exist. Note that you might find Kotlin's
also()method useful here:
The use of also() allows you to do further processing on a given object after we've performed one action (handling the found song if it exists, in this example). It allows you to chain a series of lambda functions to be performed on an object.
- Update - should update the details of the song with the ID entered in the ID field to the title, artist and year entered in the appropriate fields. Again display an error if the song with that ID does not exist.
- Delete - delete the song with the ID the user entered. Again, display an error if the song with that ID does not exist.
Hint: store the current song in a state variable.
More advanced question
Rewrite your code to use a ViewModel and LiveData, making a list of all songs in the database available as LiveData. Run the "add song" database operation from a coroutine launched in viewModelScope, within a method of your ViewModel. Also, observe the LiveData from your composable hierarchy and display a list of all songs added so far, using a LazyColumn.
Further reading
Save data in a local database using Room - Android documentation on Room.