Topic 4
Introduction to Mapping
This topic will cover the addition of maps to your Android app.
Application builds - examining the Gradle build file and version catalog
Before looking at mapping, we are going to explore how to add third-party dependencies to our app.
Android projects use the build tool Gradle to build an executable Android app from your source code and resources. You have met Gradle briefly in OODD. Gradle uses a build file build.gradle.kts to tell it how to build the project. We are now going to take a first look at the app's build.gradle.kts file and examine how to include third-party dependencies (i.e. libraries).
If you look at your build.gradle.kts (the one in your app folder, not the other one) you will see it contains a dependencies section looking something like this:
The implementation lines are specific dependencies, for example libs.androidx.activity.compose for Compose. Where are these library names defined? They are defined in another file, the version catalog. This has the filename libs.versions.toml and it defines the exact versions of dependencies. Here is an example of a version catalog:
This contains a [versions] section at the top, defining exact versions of various libraries.
This is followed by a [libraries] section, containing a series of definitions for each library. Note the relationship between this and the dependencies in the build.gradle.kts. The dots in the dependencies in build.gradle.kts correspond to dashes in the [libraries] section of the version catalog. So, for example, the libs.androidx.core.ktx line from the dependencies in the Gradle build file corresponds to the androidx-core-ktx line in the catalog.
Each library definition in the [libraries] section sepcifies three items of data which uniquely identify a specific version of a specific library: the group, the name and the version:
- The
groupis the group of libraries that this library belongs to, for exampleandroidx.corefor core Jetpack libraries. For third-party libraries, the group is often unique to the organisation providing the library, e.g. their domain name in reverse, e.g.com.example.superwidgetsfor the SuperWidgets organisation with the domainsuperwidgets.example.com. - The
nameis the name for this particular library. - The
versionis the version we want to use. We can either useversionfor a specific version, orversion.reffor a version reference. If the latter is used, the version will be looked up from the[versions]section of the catalog.
Adding a map to your app
Most location-based apps include a map as the content view of their main activity. Android comes with inbuilt map functionality via Google Maps; however to use Google Maps you need to obtain an API key and it comes with some restrictions so we are going to use an alternative mapping library: MapLibre Native, available here. (A library is a collection of classes with related functionality, such as mapping).
MapLibre Native is a third-party open source library which uses maps from any source, but commonly from the OpenStreetMap project. OpenStreetMap is a global project to provide free and open mapping data which anyone can contribute to; see the website for more details. OpenStreetMap provides the mapping data, but other projects provide the rendered (drawn) maps. One such project, which has appeared very recently and allows clients to download maps without any usage restrictions is OpenFreeMap. We will be using this.
Including MapLibre Native in your project
Add it to the [libraries] section of your version catalog:
and the specific version in the [versions] section:
and finally the dependency in the build.gradle.kts:
Where is the MapLibre Native library coming from? It downloads the MapLibre Native library from an online repository of Java/Kotlin libraries. There are two repositories used: Google's own, and Maven Central, the standard one Maven also uses. Additional repositories can be specified in the settings.gradle.kts file.
Once the dependency has been downloaded, it will be saved on your computer so that it will not need to be downloaded next time you open the project.
Making it easier - Ramani Maps
Using MapLibre on its own requires the use of the older Views API for Android user interfaces, rather than Compose. If we wish to use MapLibre with Compose, we have to either:
- write our own wrapper code to allow Views-based libraries to be used in Compose;
- use a third-party library which provides this wrapper code.
It would be nice to be able to use a "pure-Compose" approach to Android mapping and luckily we can. There are a few libraries out there which provide a pre-written Compose wrapper round MapLibre Native and one such library is Ramani Maps. Ramani Maps provides an easy-to-use Compose interface to MapLibre Native allowing you to write your map as a composable, and control properties such as the latitude, longitude and zoom level - as well as add shapes such as lines, polygons and circles to the map as markers. You can find out more about Ramani Maps in this video of the developer's presentation at the 2023 State of the Map Europe conference.
A Hello World app using Ramani Maps
Here is a simple Hello World app using Ramani Maps.
Note how we create a MapLibre composable to contain the map. We give it various properties, including a modifier, a styleBuilder and a cameraPosition. The styleBuilder allows us to define a map style, as we did for the standard MapLibre Native example. The cameraPosition allows us to define the position (target) and zoom level of the map.
Adding Ramani Maps to your project
Add the library to your
[libraries]in the version catalog:Add the version to the
[versions]in the version catalog:Add the dependency to your
dependenciessection in yourbuild.gradle.kts:
Adding shapes to Ramani Maps
We can easily add shapes to the map, such as circles, polygons and polylines. Here is an example:
Note how we add a Circle, a Polyline and a Polygon as child composables of the main MapLibre composable. We also give them properties, such as position (center for Circle, points for Polyline and vertices for Polygon), as well as color (colour names, e.g. "Red", or CSS-style RGB strings, e.g. "#ff0000"), opacity (0=fully transparent, 1=fully opaque), radius and lineWidth.
We also create a Symbol (marker).
Hopefully you can appreciate that Ramani Maps allows you to code your maps in declarative, Compose style.
Using Vulkan as a rendering back-end
The following is taken from the Ramani Maps documentation
It is possible, if using an emulator, that you may encounter problems rendering text and symbols on an emulator with certain versions of MapLibre GL Native, and by extension, Ramani Maps.
This is discussed in issue #3648 on MapLibre Native and appears to be due to reliability problems with OpenGL emulation. OpenGL is one the leading cross-platform 3D graphics APIs; MapLibre Native uses OpenGL to render the maps even though they are only 2D.
As discussed in this issue, a potential workaround is to use Vulkan as a back-end, via the Vulkan build of MapLibre Native. Vulkan is an alternative leading 3D graphics API.
How can you specify to use Vulkan? By setting up an exclusion in your build.gradle.kts, you can force a Vulkan build of MapLibre Native to be used rather than the bundled OpenGL build. Do note that this is not guaranteed to work as it is not the same version of MapLibre Native that Ramani Maps was built with, bu in testing appears to do so.
Setting up version catalog
In your libs.versions.toml version catalog, you can add a version specifier for maplibreVulkan in the versions section, with a version matching the MapLibre Native version that your Ramani version is using, currently 11.11.0:
and then specify the Vulkan version of MapLibre, e.g.
Setting up build.gradle.kts
Then in your build.gradle.kts, include the Vulkan version of MapLibre Native, and specify that the bundled, OpenGL, version of MapLibre should be excluded from the Ramani dependency:
Alternate library - osmdroid
Using Vulkan should fix most issues, but if you are still having problems with Ramani Maps and MapLibre, an alternative mapping library, osmdroid can be used. Please see the Appendix
BoxWithConstraints
We have looked at the Box layout already, however there is an extended version named BoxWithConstraints which can be useful if we want to display content at the bottom of the screen and ensure the remaining content only occupies the area it needs.
The BoxWithConstraints is an enhanced Box which allows us to obtain the Box's width and height from within it. Why is this useful? It makes it easier to create layouts which adapt to the screen size. For example, in our mapping application we might want to set the height of the row containing the text fields and buttons to 80dp. How big must the map be in this case? You want it to occupy the remainder of the screen. To calculate this, you subtract the height of the row (80dp) from the total height. Inside a BoxWithConstraints, you can use:
this.maxWidthto obtain the total width;this.maxHeightto obtain the total height.
These give a value in dp so you can subtract the height of the controls row, also in dp, to obtain a height in dp for the map. You can then call Modifier.height() to set the height of the map to this calculated height.
Exercises
- Try out the simple Ramani Maps above.
- Set the latitude and longitude to the city centre (lat 50.902614 North/lon 1.404464 West)
- Set the latitude and longitude to New York (lat 40.75 North, lat 74 West).
- Set the latitude and longitude to your home town.
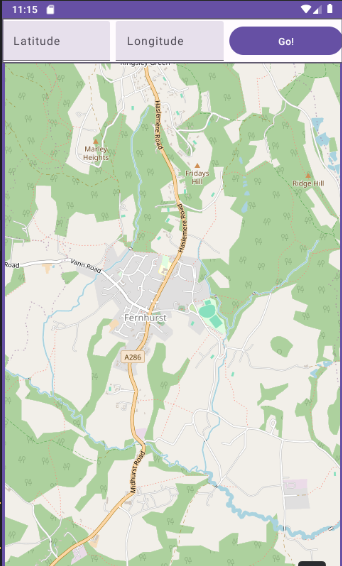
You are now going to make the map application more interesting by allowing the user to enter a latitude and longitude in two
TextFields. Create a Compose layout with:- a row at the top, containing the two text fields and a button;
- your map composable (from question 2) occupying the rest of the screen space.
The intended layout is shown below:
The application should include these state variables:- most recently entered latitude and longitude (both strings);
- current position (a
LatLng- part of MapLibre Native).
When the user enters a latitude and longitude in the text fields, the latitude or longitude (as appropriate) state variable should be updated. When the user clicks the button, the
LatLngshould be updated appropriately.Ensure the map updates when the
LatLngchanges.
Use a Modifier.weight() of 1.0 for the text fields and button.
Important! Ensure the row containing the text field and button has a zIndex specified in the Modifier and set to 2.0f. zIndex represents vertical height and ensures that the row will stack on top of the map; the map overflows the space allocated to their parent Composable and occupies the rest of the screen.
- Enhance your GPS application from Topic 3 so that it shows a Ramani map of your current GPS location.
- Position the map at the university (50.9079, -1.4015) and add these shapes to the map:
- The university, at lat 50.9079, longitude -1.4015. Use a red circle with radius 100.
- The Saints football stadium as a green polygon with coordinates (50.9063, -1.3914), (50.9063, -1.3905), (50.9053, -1.3905) and (50.9053, -1.3914).
- The route to the the railway station as a blue polyline of width 3 and coordinates (50.9079, -1.4015). (50.9071, -1.4015), (50.9069, -1.4047), (50.9073, -1.4077), (50.9081, -1.4134).
- Change the layout so that the row containing the text field and button is at the bottom of the screen, not the top. Try using a plain
Boxfirst, then aBoxWithConstraints, setting the row's height to50.dp. - Advanced: investigate the
isDraggableandonDragFinishedproperties of a circle. The latter occurs when the user finishes dragging a shape, and takes a lambda which receives the newLatLngas a parameter. Make your circle draggable, and update theLatLngstate variable to the position that the circle is dragged to.
Appendix
Alternative mapping library: osmdroid
If you are still having problems with MapLibre/Ramani on an emulator even after switching to Vulkan, there is an alternate mapping API which you can use as an alternative - osmdroid. This is an older library, not currently in active development (last release was late 2024) which is not Compose-based but I have provided a simple Compose wrapper for it.
Using osmdroid
You need to include osmdroid into your project:
Add an entry to the
[libraries]section of your version catalog (libs.versions.toml):Add a version to the
[versions]section of your version catalog:Include it in your
dependenciesin the appbuild.gradle.kts:
You should also add this source code to your project, call it OsmdroidComposable.kt:
To use it, include it in your composable hierarchy:
A full example is available at the GitHub repository.
More on osmdroid
Like MapLibre and Ramani Maps, osmdroid uses OpenStreetMap maps. These are downloaded from the OpenStreetMap tile server. It can use various tile sources, representing different styles of tiled map. The default one is the MAPNIK style - the default style for OpenStreetMap. Other available styles include OpenTopoMap, which shows contours and hill shading. Here is an example of using a custom style (OpenTopoMap):