Topic 3
Location, Permissions and View Model
Android Permissions
The manifest file and Permissions
Android apps feature the concept of permissions. Apps need to be granted permissions to perform sensitive operations. Sensitive operations can include:
- Using the internet - because this might incur a cost to the user, and have potential privacy/security concerns;
- GPS for tracking your location - because this could be potentially abused (e.g. by stalkers)
- Reading from and writing to files - again this has security concerns.
- Using the camera and microphone.
The permissions an app needs are specified in the AndroidManifest.xml file, within the manifests directory within your project, before the <application> tag, with <uses-permission> tags. For example, to specify that we need internet permission, we would add the line:
The classic permissions model
Before Android 6, permissions were handled solely at install time, so a user was informed what permissions an app needed when they installed the app. The user would then grant the app all these permissions by installing it. However, this model had some disadvantages. It is not very flexible; a user might want to use some permissions but turn others off. For example, if a user is installing a mapping app which allows the user to take photos, they might wish to use the GPS but not the camera, for privacy reasons.
Runtime Permissions
Android 6 (API level 23) uses a runtime permissions model, in which permissions can be turned on and off at run time, rather than install time. With Android 6 permissions, you can grant an app certain permissions but not others, at run time. You can also turn permissions on and off at any time via the device's Settings.
To enforce the use of Android 6 permissions, the targetSdkVersion of your app must be at least 23: the targetSdkVersion specifies the level of standards your app will follow.
Using the Android 6 permissions model
- You must still declare the permissions you need in the manifest file
- In addition, you now need to include logic in your application to perform checks on whether the appropriate permission has been granted. For example, before attempting to obtain the device's location using the GPS chip, your code needs to check whether the GPS permission has been granted by the user or not, and if it hasn't, the app needs to request the permission by asking the user whether they want to grant it.
Dangerous permissions
Certain permissions in Android are more sensitive than others, these are called dangerous permissions. Dangerous permissions include location, using the GPS (for privacy reasons), camera (even more so) and file I/O (because of the risk of a rogue app reading private data on your device). It is these dangerous permissions which require runtime permission checking, and these permissions which can be turned on or off in the Settings.
Less sensitive permissions, such as internet, can be done purely via the manifest, as before; these do not need runtime permission checking.
See this documentation on the Android site
What happens from the user point of view?
- When a user runs an app which uses dangerous permissions, a dialog is presented to the user, asking them whether they wish to grant or deny that permission (or strictly speaking, that permission group - certain permissions, such as reading files and writing files, are grouped together)
- If a user presses 'grant', code associated with granting the permission (see below) will run
As well as granting the permission at runtime, a user can grant permission by going into the phone's Settings, selecting "Apps" and then the appropriate app, and then turning the appropriate setting on. A user can also revoke the permission through the Settings.
Implementation details
Checking whether a permission has been granted
You use the checkSelfPermission() call for this.
Here is an example of checking for the ACCESS_FINE_LOCATION (listen to GPS) permission. This is in a custom function called checkPermissions(), which would be called from onCreate().
Note how checkSelfPermission() takes the permission we are interested in (ACCESS_FINE_LOCATION) as an argument.
This method will return one of these constants:
PackageManager.PERMISSION_GRANTEDif the permission has already been granted by the user;PackageManager.PERMISSION_DENIEDif not.
If you are targeting API level 23 and above, Android Studio's lint tool will produce an error if you leave this check out (and if you disable the lint tool, the app will crash at runtime with a SecurityException)
Requesting permissions in your code
If checkSelfPermission() returns PackageManager.PERMISSION_DENIED, then you should request that permission from the user in your code. This is done using a launcher. A launcher is an Android API class which is used to launch various types of task involving user interaction (such as a permissions dialog), and runs a callback function (typically a lambda function) once the user has performed the required interaction. The launcher is created with the method registerForActivityResult() with parameters of:
- the contract - essentially the type of operation we want to launch (
ActivityResultContracts.RequestPermission()here); - plus the lambda to run when the operation (requesting permission from the user here) has completed.
Here is an example:
Note how in this example, we create a launcher called permissionLauncher and specify a lambda function which takes one parameter, isGranted. This lambda will run as soon as the user either grants or denies the permission. The isGranted parameter will be either true or false, as a result. So the lambda will include logic to start the GPS (if the permission was granted) or inform the user that the permission was not granted (if not). Note how we use a Toast here - a small popup message which appears on the screen above the UI. Toast takes this form:
this refers to the activity. length can either be Toast.LENGTH_SHORT or Toast.LENGTH_LONG.
We actually launch the launcher with :
We can request multiple permissions with ActivityResultContracts.RequestMultiplePermissions() and then pass an array of the required permissions to the launcher, e.g:
Location
Having covered runtime permission handling, we are now going to look at a key piece of functionality which uses it; obtaining your current location. Many of the most interesting mobile apps are location-based apps, in other words, the app is sensitive to the user's location on earth. We might, for instance, have an app which displays a map of your current location. Or an app which looks up the nearest pubs, bus stops or railway stations. Such apps send the user's location to a web server, which then delivers data near that location. Most smartphones contain a GPS chip which obtains the device's location by communicating with Global Positioning System (GPS) satellites: the same mechanism used in car satnav systems. So, since location is so important in mobile app development, we are going to look at it now.
Latitude and Longitude
In order to understand location-based applications, it is important to understand the coordinate system used on the earth. The most common coordinate system uses latitude and longitude. Latitude is a measure of how far north or south you are: the equator is at 0 degrees, while the North Pole is at 90 degrees North, we are at about 50 and Spain is at about 40. Longitude is a measure of how far east or west you are: 0 degrees of longitude is referred to as the Prime Meridian (or Greenwich Meridian) and passes through Greenwich, London. By contrast Germany is located between approximately 7 degrees and 15 degrees East, while New York is at 74 degrees West and the west coast of North America at approximately 120 degrees West.
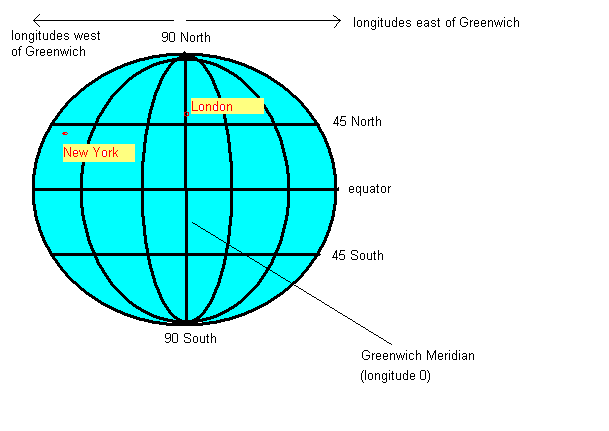
So a given point on the earth can be defined via its latitude and longitude. The university is at approximately, 50.9 North (latitude) and 1.4 West (longitude). By convention, latitudes north of the equator and longitudes east of Greenwich are treated as positive, so we can also define our position as longitude -1.4, latitude +50.9.
Ethical issues with geolocation
There are important ethical issues when it comes to location. Potentially, a malicious app could gather your location and send it to a server with a user's personal details, which could allow the user to be tracked without their consent. For this reason, location tracking is treated as a dangerous permission and must be granted by the user at runtime.
Furthermore, it is recommended to create an explicit privacy policy on your app's website (which can be linked to from Google Play) which spells out to users why the app needs location information and what will be done with it.
Adding location permission to the manifest file
There are two permissions for location: ACCESS_FINE_LOCATION for accurate (GPS) position, and ACCESS_COARSE_LOCATION (for less-accurate (wifi and cell-tower) position. As for any permission (dangerous and non-dangerous), you need to add the appropriate permission to the manifest:
Basic use of Geolocation
This incomplete example shows how to obtain your location. Note that a fully-working example would also need to check whether the ACCESS_FINE_LOCATION permission has been granted at runtime, and request it if not, using the technique described above.
This code sample shows how to use the Location API. It will listen to the device's GPS and update the main content view with the current latitude and longitude (position on earth). So how does it work? The key thing is that there are three main components involved in obtaining your location:
- the location provider (representing the actual provider of your location, such as the GPS, WiFi network or cell tower network). A string is used to refer to the provider.
- the location manager (class LocationManager) which controls access to the provider, allowing you to set such things as frequency of updates.
- the location listener: the object which handles location updates, so that every time the GPS location changes, for example, code in the location listener will run to react to the change in location. The location listener is represented by the
LocationListenerinterface - remember we met interfaces in OODD. The location listener is the class which implements theLocationListenerinterface, e.g. here it's theMainActivity:
In the LocationListener we provide the methods specified by the interface. The key method is onLocationChanged(), which runs when we get a new location.
To go through the code above in more detail:
First we obtain a LocationManager. We do not instantiate a LocationManager object; instead we ask the system to obtain the default location manager for us with:
We then ask the location manager to update the app with new location informatiom, using:
Note the parameters:
- The first parameter specifies we are using a GPS provider (we could, alternatively, request a network provider - e.g. WiFi/cell tower - instead with LocationManager.NETWORK_PROVIDER), though these are less accurate.
- The second parameter specifies the frequency of updates in milliseconds (0 means update as frequently as possible);
- The third parameter specifies the minimum distance we must travel, in metres, before an update is obtained (again 0 means update as frequently as possible);
- The fourth parameter specifies the LocationListener object which will process the location updates received - here it is this, i.e the current Activity will act as the LocationListener, as we discussed above.
In a LocationListener, these methods handle different location events:
- onLocationChanged() (compulsory), which takes a Location object as a parameter. This runs when a new location is received from the provider.
- onProviderDisabled() and onProviderEnabled() (optional), which run when you physically disable, or re-enable, that provider (e.g the GPS) from your device. Often you can leave these blank but if you want specific behaviour to occur when the user switches the GPS on and off, you would write it here.
- For more on these methods, see the API documentation.
The onLocationChanged() method takes a single parameter - a Location object representing our current location. It has two properties, latitude and longitude, for getting the actual latitude and longitude. So, in this app, we simply display the current latitude and longitude with a Toast.
Testing with a virtual device
If you do not have a real device, or are located indoors (as you will probably be during the class; indoor GPS signals are not reliable) it is possible to test it in a development environment (with a GPS provider) by sending "virtual" locations to the emulator.
This is quite straightforward. Click on the three dots (...) at the top of the controls of the virtual device. This opens the Extended Controls.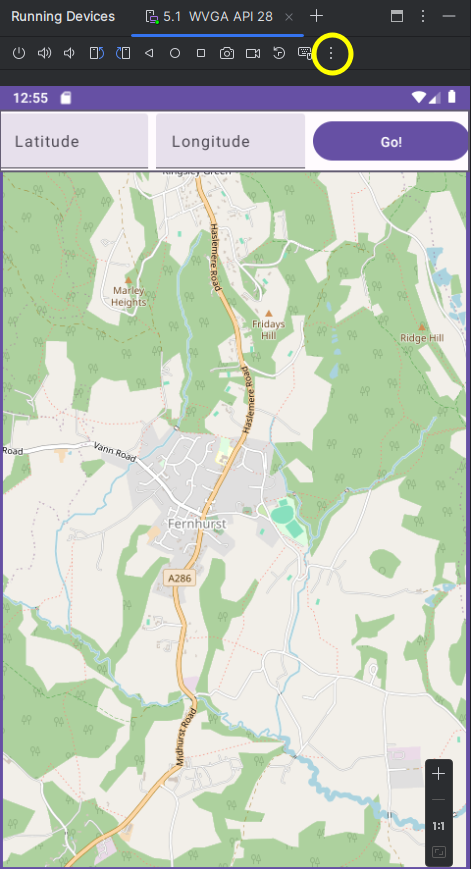
This will take you to a dialog showing a map, by default located in Silicon Valley, California. You can change location by moving the map or searching for locations and then clicking "Set Location". This will send a virtual GPS signal to the device, containing the latitude and longitude entered.
Updating the UI using the GPS position
Let's imagine we want to use GPS location with Compose. How might we do this? You can probably imagine the general approach: whenever we get a new GPS position, we need to update a state variable within our composable hierarchy, containing the latitude and longitude.
Exercise 1
You must be logged in to attempt exercise 1.
The ViewModel
Why view models?
A common aim in object-oriented programming is to make all classes as concise, and focused on one thing, as possible. This makes the classes smaller and easier to understand, and thus maintain. A small, tightly-focused class (focused on one particular thing) has high cohesion. Achieving high cohesion is well-known good software engineering practice, as you should know from OODD.
However, in Android development, if we are not careful our activities can quickly become very large and "bloated", and end up containing a lot of variables hoding the application's data and methods to manipulate that data. Thus they have low cohesion, as they are trying to do too many things. It would be better to try and separate out the activity from its data so that the activity only manages core operations (such as onCreate() and setting up the UI) and have another class which stores the data.
Luckily we can do this quite easily with Android thanks to the use of a ViewModel (see the Android documentation). What is a ViewModel? It's an object which holds the data which needs to be displayed by the application, and is responsible for "preparing data for the UI" (Android docs), as part of the Model-View-ViewModel (MVVM) architecture, which we will return to in the database topic.
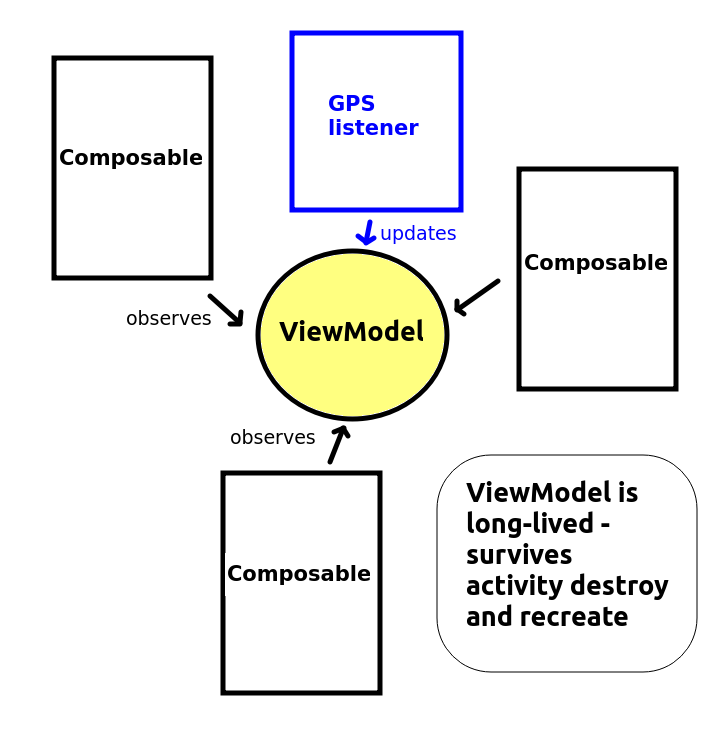
As well as enabling higher cohesion, using a ViewModel in Android has the advantage that it is persistent throughout the lifetime of the application, even if other components such as activities are destroyed. An important feature of Android that might not be obvious is that an activity is destroyed and re-created when it's rotated. This can cause difficulties if you want to preserve data; by default, all data stored in an activity will be destroyed when it's rotated, as it belongs to a particular instance of the activity. If you use a ViewModel instead, the data will be preserved and will be accessible by the activity when it is re-created.
Furthermore, use of a ViewModel allows data to be updated from non-UI parts of your application (e.g. the Location API as seen above) and then observed from your UI, such as Jetpack Compose. In this way, Compose UIs can be updated when data external to them, such as GPS location or a database, updates.
Creating a ViewModel
Creating a ViewModel is quite easy. We need to ensure the lifecycle-runtime-ktx Jetpack library is in our dependencies (group androidx.lifecycle, name lifecycle-runtime-ktx), but this should automatically be done in current versions of Android Studio.
This is creating a simple ViewModel to store someone's first and last name.
Using the ViewModel from an Activity
We then need to initialise the ViewModel from an Activity. The example below shows how to do this:
Note how we declare a variable viewModel within our activity, of class TestViewModel (our ViewModel class shown above). Note also how we initialise it with by. What does this mean? We are using a Kotlin feature known as delegates, which we will cover later - but for now, all you need to know is that we are creating an instance of the TestViewModel class using a custom, non-default object creation process.
Updating the ViewModel and the UI
Later on, at any point, we can update the ViewModel's data, e.g.
Clearly this is a very simple example, but for more complex apps, which need to store and display large amounts of data, a ViewModel makes sense. Furthermore, even in this simple example, a ViewModel can be advantageous, as the data remains in memory even when the device is rotated. If we simply stored the first name and last name in the activity, it would be lost when the device is rotated, as the activity (and all its data) is destroyed and re-created. The ViewModel by contrast is stored independently to the activity in memory.
Using LiveData with ViewModel
Syncing the UI with the ViewModel
A common situation involves updating the UI whenever data in a ViewModel changes. For example, if we are storing a GPS position in a ViewModel, we probably want the map to update to display the new GPS position. We can do this manually, but this can be a bit tedious. Instead, we can employ the observer pattern (which you met on OODD). We can create observable live data within our view model and attach an observer to this live data. Inside the observer we can write code to update the UI whenever the live data changes.
LiveData - Implementation details
ViewModel is used together with LiveData. As indicated abobe, a ViewModel can hold LiveData which is observed by an Observer. When the data changes, the Observer callback function - a lambda, typically - receives the altered data and uses it to update the UI. In a Compose application, a state variable would be updated with the altered live data from the view model.
We will use location data as our example of LiveData. The latitude and longitude (from the Location API) will be stored in a ViewModel and made available as LiveData which the UI can then observe (so for example, a map can update with the latitude and longitude contained within the LiveData.)
First the ViewModel, which contains a LatLng object and a LiveData object wrapping that LatLng:
Note how we use a custom setter with the latLng object within the view model (we introduced these in OODD). In the custom setter we update the live data as well as the latLng object itself. This ensures that the live data keeps in sync with the latLng object.
We can then update the latLng in the view model from our onLocationChanged(), when the GPS location changes:
Observing the LiveData
We observe the LiveData from our UI by calling its observe() method. observe() expects either an Observer object, or a lambda which will run whenever the live data changes:
Exercises
Questions
- Use the code examples above to produce a complete Jetpack Compose app which displays the current GPS latitude and longitude on-screen within
Textcomposables. When the GPS position updates, theTextcomposables should update. You will need to use runtime permission checking, and the Location API. You will also use aViewModelwithLiveDataand an observer.