Topic 1
Introduction to Android Development
The Android mobile operating system is the leading smartphone and tablet operating system. From a minority operating system only running on one phone (the T-Mobile G1) it has grown into one of the leaders in the smartphone operating system field, along with iOS (on the iPhone).
Why develop for Android?
There is one very important difference between Android and many of its competitors. It is an open source operating system, which means that you are free to modify it for your own ends. Even more crucially for app developers is that as a result of its open-source nature you can develop and distribute applications without restriction. This is in contrast to some of the other contemporary mobile development options in which the operating system vendor restricts distribution to a single channel owned by themselves, and "vets" software before making it available. Android has an official distribution channel (the Play Store), but this is somewhat more liberal with accepting apps than some of the other vendors, though still has some restrictictions. Also, there are alternative distribution channels for Android such as F-Droid which is open to any non-malicious software which is open-source.
As Android is open-source, different vendors have made their own modifications to it, for example Samsung. Furthermore, there are a number of entirely community-driven modified versions of Android available, such as Lineage OS, which aim to continue supporting older devices with the latest versions of Android even when official releases are no longer provided, which has the advantage of prolonging device lifetime with obvious benefits for people's personal finances and the environment.
Android versions
At this point it is worth elaborating on the various versions of Android. As of last May the percentages of devices running different versions are as below (this is taken from Android Studio):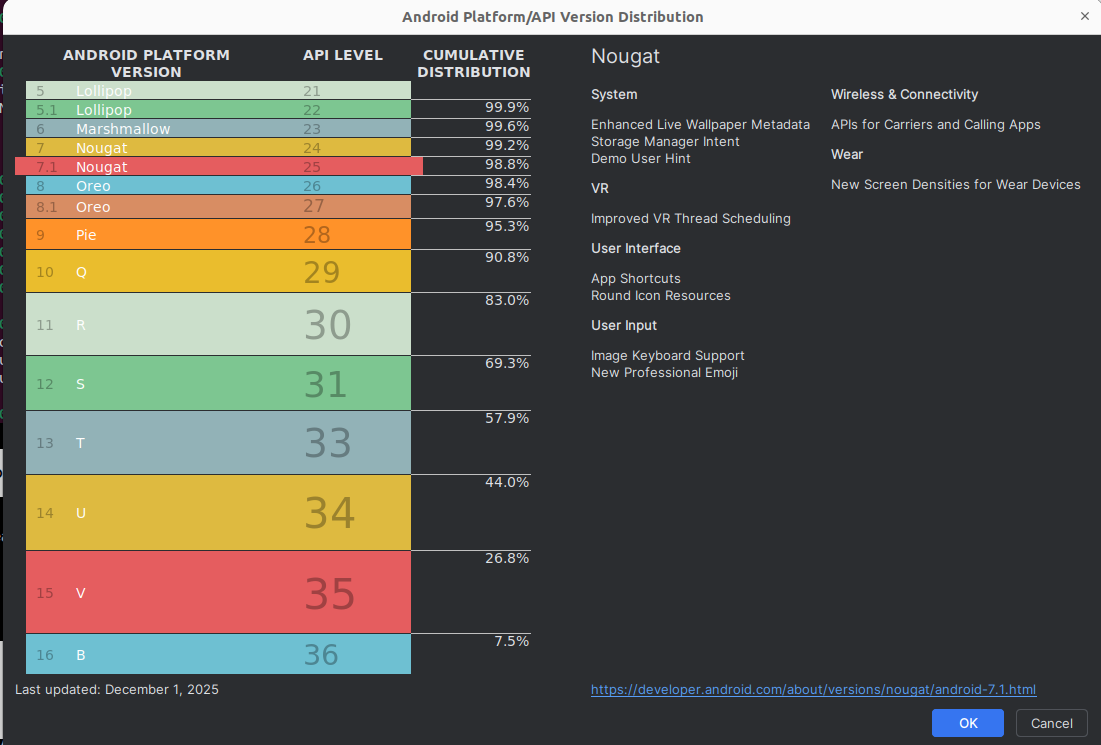
The most recent version deployed on actual mobile devices is 16, however, this is a very recent release with few devices running it. Many devices are running 9 (Pie), 10 (Q), 11 (R), 12 (S), 13 (Tiramisu), 14 (Upside Down Cake) and 15. The majority of devices are running Marshmallow (Android 6 or API level 23) upwards. (There is a particularly good reason for targeting 23+, relating to permissions handling, which we will cover in due course).
Another concept that you need to understand is the API level. The Android API is the set of classes which are used to program Android apps with. The API level denotes revisions to the Android API, in a sequence of positive integers starting from 1. Thus, the numbers used for the API levels are not the same as those used for the Android versions, but each API level corresponds to a particular version. The idea is that each time Android itself is updated, the API is updated too. For example:
- API level 15 corresponds to Android 4.0.3;
- API level 19 corresponds to Android 4.4;
- API level 23 corresponds to Android 6;
- API level 26 corresponds to Android 8.0;
- API level 28 corresponds to Android 9;
- API level 30 corresponds to Android 11;
- API level 31 corresponds to Android 12;
- API level 35 corresponds to Android 15
When developing an Android app, you have to specify the minimum API level on which your app will run. Thus an app with minimum API level 23, for example, will only run on 6+. As seen above, the vast majority of devices are running at least API level 23 (Android 6; Marshmallow), so if you specify API level 23 as a minimum you will be targeting the majority of devices.
Runtime Environment
With standard Kotlin or Java, you compile to bytecode which is then run using the Java Virtual Machine (JVM). Android is similar but rather than using the standard JVM, it uses its own virtual machine and corresponding bytecode format, producing executable files known as DEX files. So "regular" Java bytecode will not run on Android and Android apps will not run on a regular JVM.
Dalvik was the original virtual machine, which versions of Android up to 4.4 used. With Android 5.0, a new virtual machine (ART : Android Runtime) (see here) is used instead. See here for more details on Android virtual machines.
General nature of Android development
Android development is generally done in either Kotlin or Java, with Kotlin the preferred language. However, because the environment differs from a standard desktop PC, the actual libraries available differ somewhat from the standard Sun/Oracle Java Development Kit. As well as the Kotlin standard library, many standard Java features from packages such as java.io and java.util are available; however (as you might expect) the standard Java GUI libraries (designed for desktop applications) are not, and also the structure of an Android application is significantly different due to the different style of interaction with a mobile device compared to a desktop computer.
What do you need to start Android development?
To get started on Android development you ideally need the Android Studio IDE. Android Studio is the recommended IDE for Android development. It is based on JetBrains' IntelliJ IDEA .
It is also possible to develop apps purely using command-line (console) tools.
Android Studio provides an IDE 'wrapper' round the core Android development environment, which contains the following components:
- The Android Software Development Kit (SDK): provides Android libraries, tools to generate bytecode and distributable apps and the SDK Manager which allows you to download libraries for different versions of Android;
- The AVD (Android Virtual Device) Manager: allows creation of virtual phones or tablets allowing you to test your app in the absence of a real device.
You can access the Android SDK and the AVD Manager either through an IDE such as Android Studio or independently, via the command-line.
Getting started
The best way to explore the different components of the Android development environment is to get started with Android Studio. Launch Studio, you will see a screen like this:

Creating a project
Select "Create New project". You will then see this screen. This allows you to create a new project. You will then see a screen like this: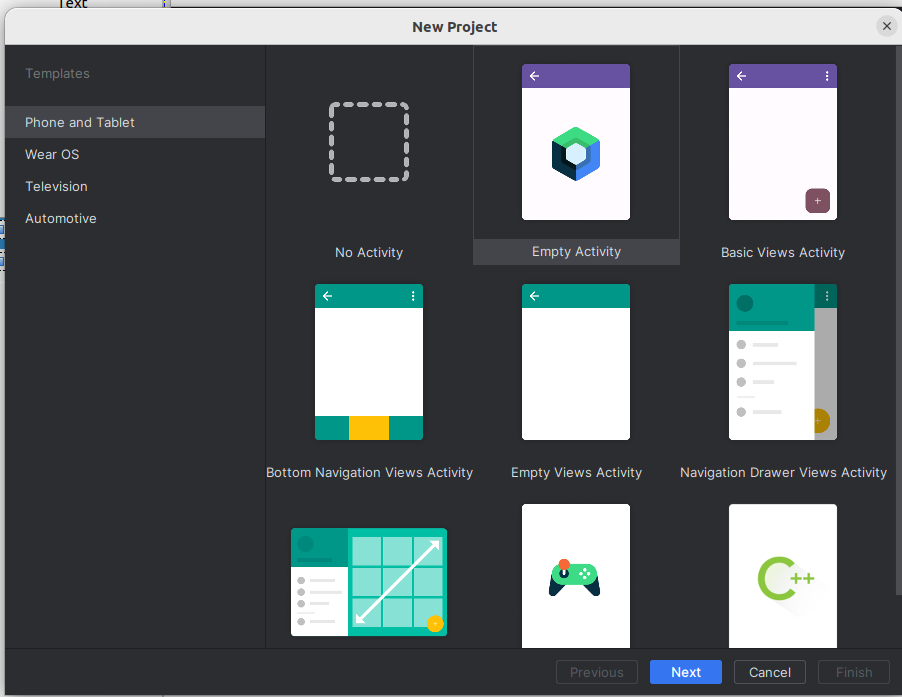
Select "Empty Activity", as shown.
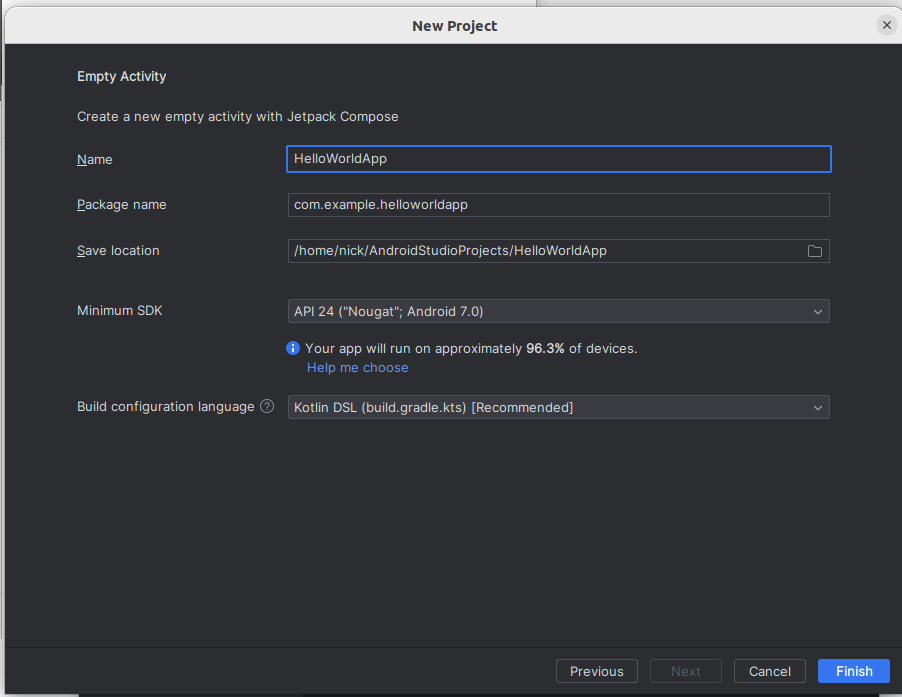
To explain these one by one:
- Name: the name of your application.
- Package name: the Java/Kotlin package name that will be used for your application.
- Save location: where your projects will reside. You should make sure that this is somewhere easy to find, so you can navigate to it later.
- Minimum SDK: what is the lowest Android API level which will run this app? You can leave it on the default (4.4 KitKat).
- Build configuration language: what language will the build file
build.gradle(the equivalent ofpom.xmlfrom Maven) use? Leave as Kotlin DSL. We will discuss this more fully in the near future.
Once you click "Finish", your project will be created.
Explaining the layout of a project
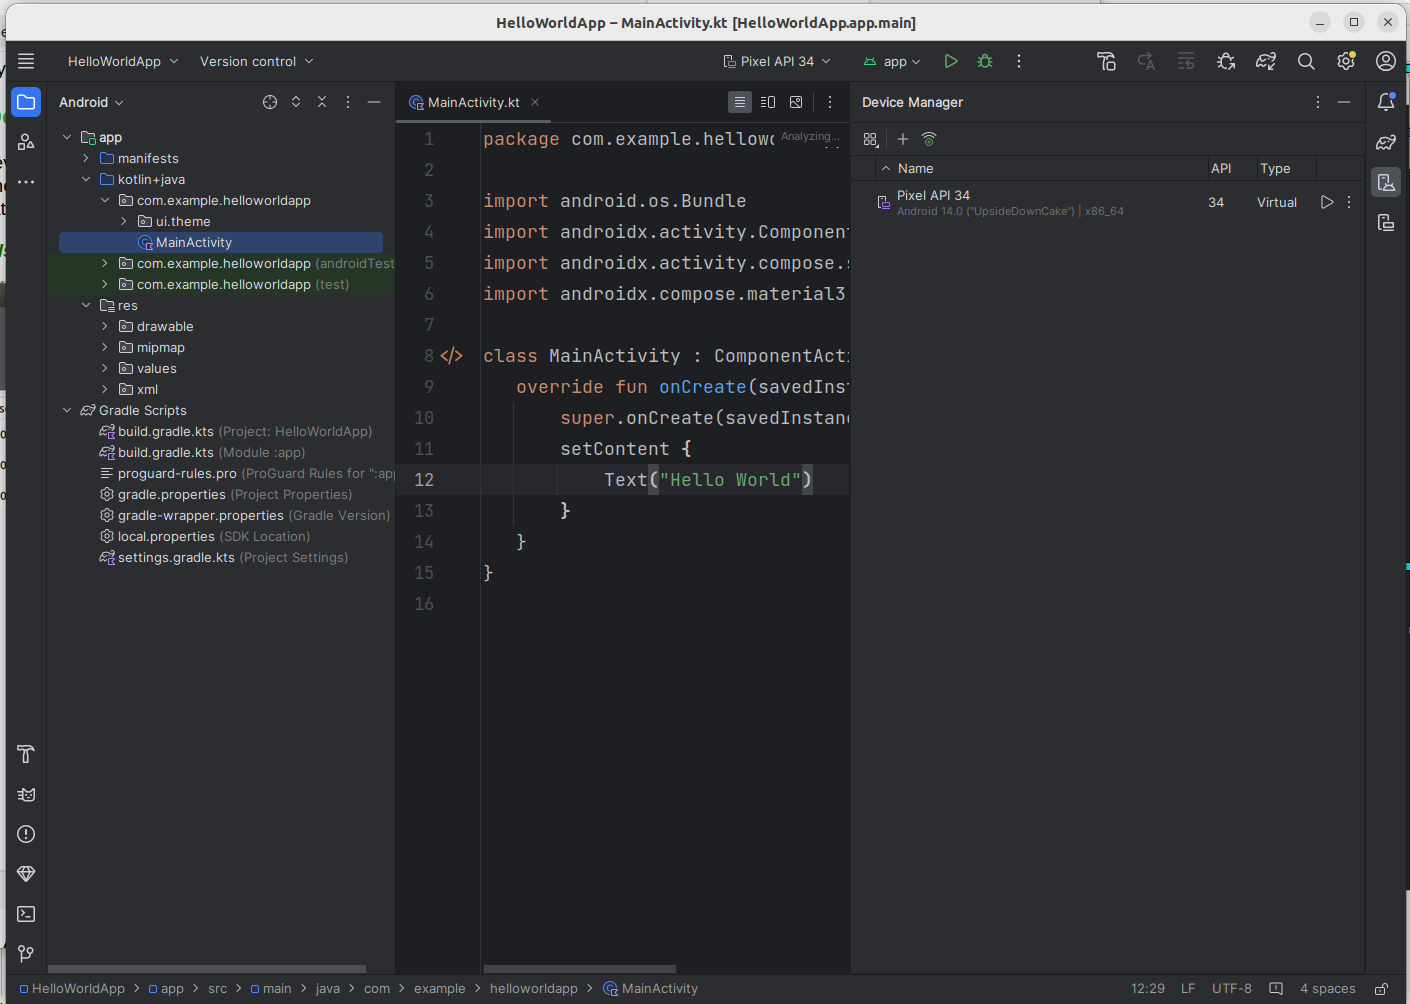
The Android project will open, with a screen something like this: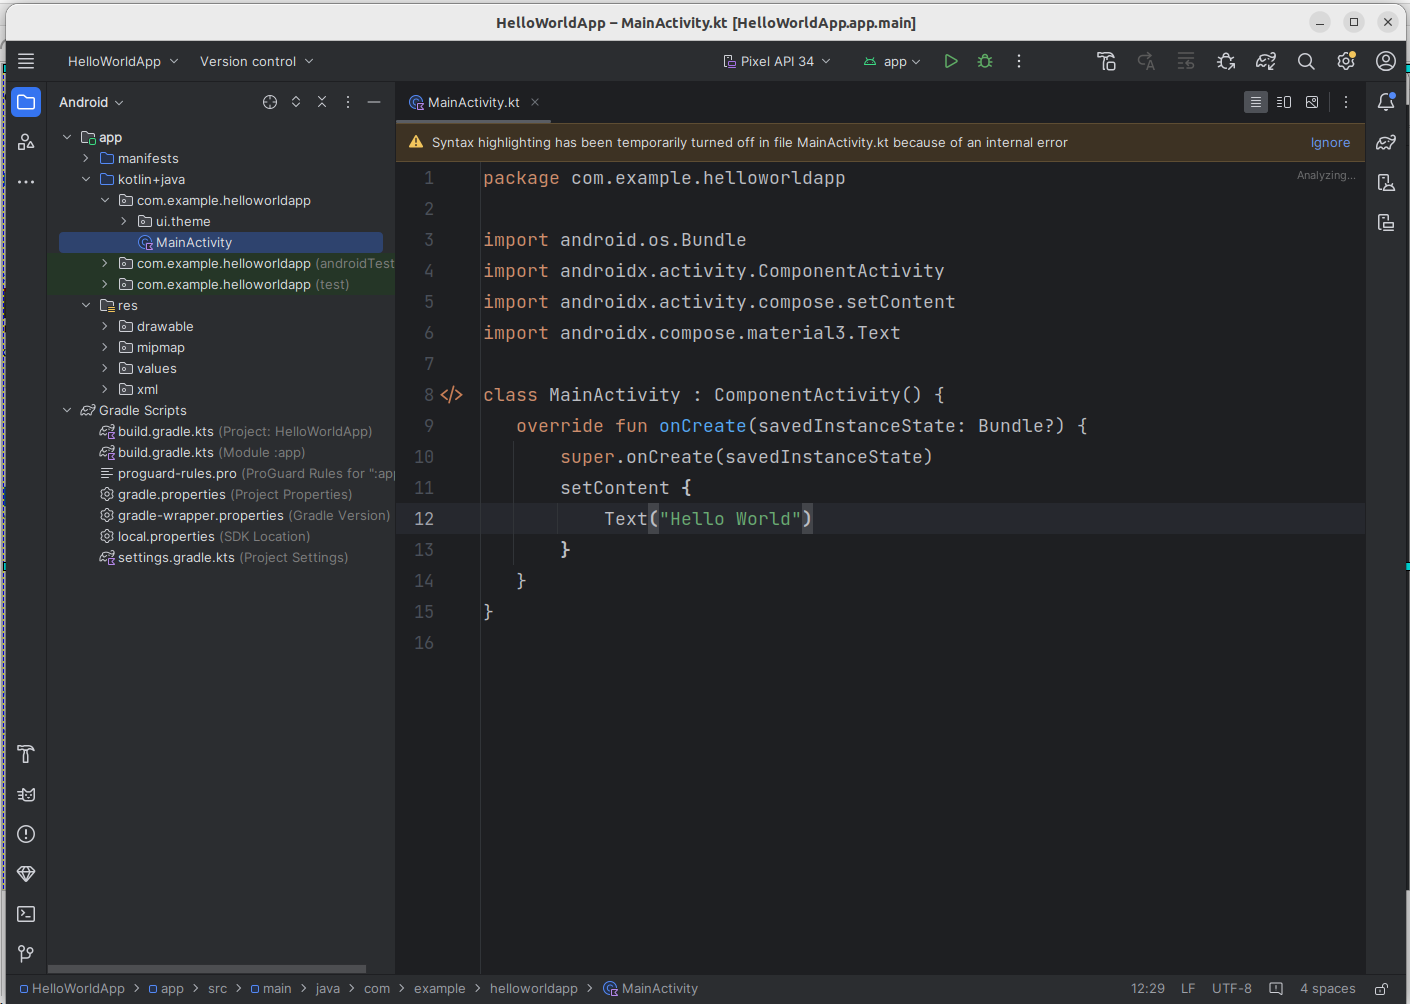
On the right-hand side is the main code editor, containing your Kotlin code. Note that some code is auto-generated: we will explain this later.
On the left-hand side, the project structure is shown. An Android project contains of a series of files and directories, each containing different things. To explain each:
- manifests: this directory contains the manifest file, AndroidManifest.xml, which contains information about the app and its contents. We will return to this later.
- kotlin+java or java: the actual code. Note how it contains our activity, MainActivity.kt. Note that in older versions of Android Studio it's called java even if we are writing Kotlin.
- res: the resources. These are additional files our app needs, such as screen layouts, menus, images and so on. We will examine resources in more detail later.
- Gradle Scripts: Gradle is a build tool to automate the process of building an application. It is similar in role to Maven; in other words it reads a configuration file which tells it how to build your application (including such things as third-party Kotlin or Java libraries - dependencies - our app needs to run), downloading them from online repositories if necessary. The Gradle build configuration file is build.gradle.kts. In this file, we also specify the minimum Android version supported by our app.
Note that there are two build.gradle.kts files, one to build the project as a whole, and another one to build the current module (the one in the app directory). In some cases, a project may contain multiple modules, though not in our case. Generally, you will find theat the app build.gradle.kts is the one you need to modify most frequently.
Hello World!
We're now going to start - as always in software development - with a Hello World app. Delete all the pre-generated code and replace it with this:
What does this code mean?
- As mentioned above, the entry point to an Android application is an activity. An activity is basically a single screen of an Android app. It contains "widgets" or user interface elements, through which the user can interact with the app: for example, text fields, buttons and radio buttons. An Android app will typically consist of several Activities, representing different screens within the app, but there will be one main activity which launches when the app is launched. The main activity is defined in the manifest file (see later)
- The onCreate() method is the actual entry point to the activity. It can be viewed as roughly equivalent to the main() method in standard Kotlin, or in C or C++. Whenever an activity is created for the first time, its onCreate() method is called: therefore, initialisation code should be placed in onCreate().
- Note that the activity here is an ComponentActivity, which is a subclass of plain Activity. This allows us to use Jetpack Compose for our UI - see below.
- The first thing we do is call the version of onCreate() in the superclass (i.e. AppCompatActivity). In this way, we can ensure that common functionality which occurs when all activities are created will also occur in our case.
- We then define the layout. Note that the current standard in Android UI development is now Jetpack Compose. Jetpack Compose is a new way of defining UIs using Kotlin objects, and is increasingly favoured over the older method of defining UIs in separate XML files. We will however look at the older, XML-based method in a later week as you will probably still encounter it in real-world Android projects.
Setting up an Android Virtual Device
If you do not have an actual Android device, you will need to set up an Android virtual device (AVD) before starting programming. This is an emulator which you can use to test your apps as you develop them. It resembles an actual phone, and the user interface looks just like a user interface on a real Android phone so you can test your apps fairly realistically. When creating an AVD you will be prompted for various properties of the emulator such as resolution.
To set up an AVD in Studio, select Tools-Device Manager. This will launch the Android Device Manager from within Android Studio, as shown below:
This screen shows that there is one AVD already set up, called Pixel API 34. On your system there probably won't be any yet. So Set up a new AVD as follows:
- Click the "Create Virtual Device" button on the Device Manager. This will bring up a dialog like the one below:
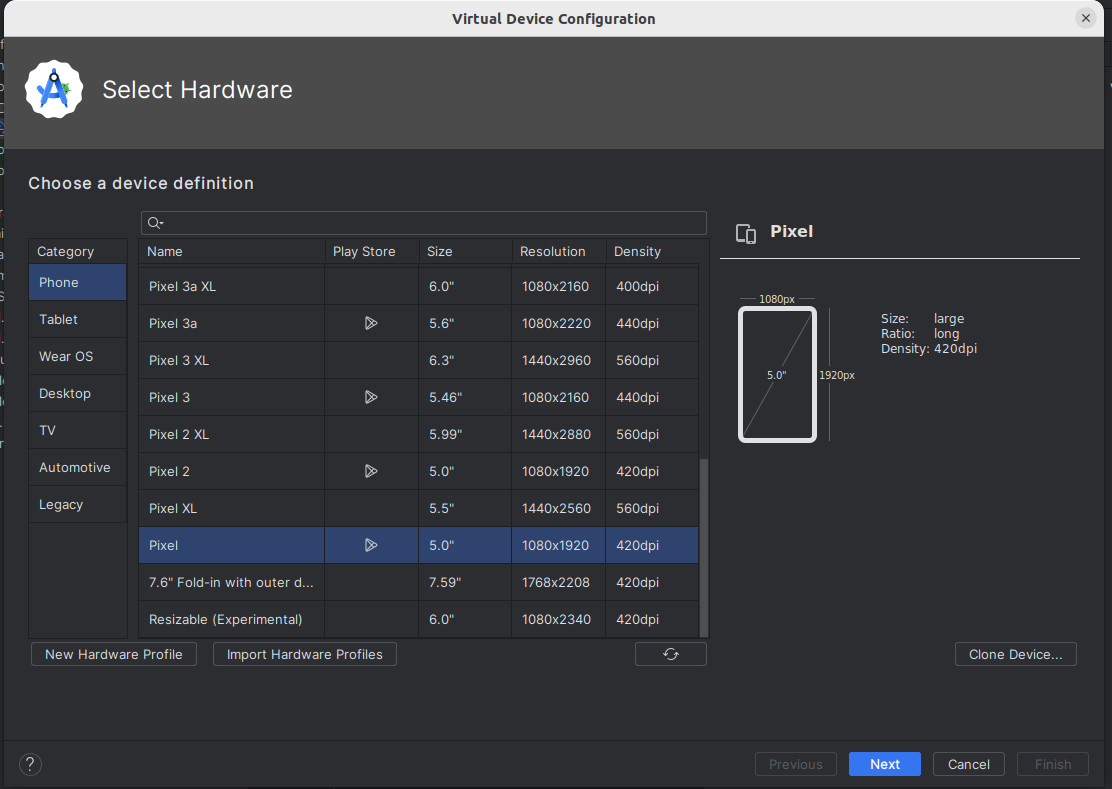
- Select one with lower resolution (higher-resolution ones may be slow). Pixel is a reasonable one to pick.
- Select an Android version for the virtual device. Choose an x86 image as it will be faster, but do NOT choose one with Google APIs as that will be a larger download, which could be slow on domestic internet, and we are not going to use Google APIs on this module.
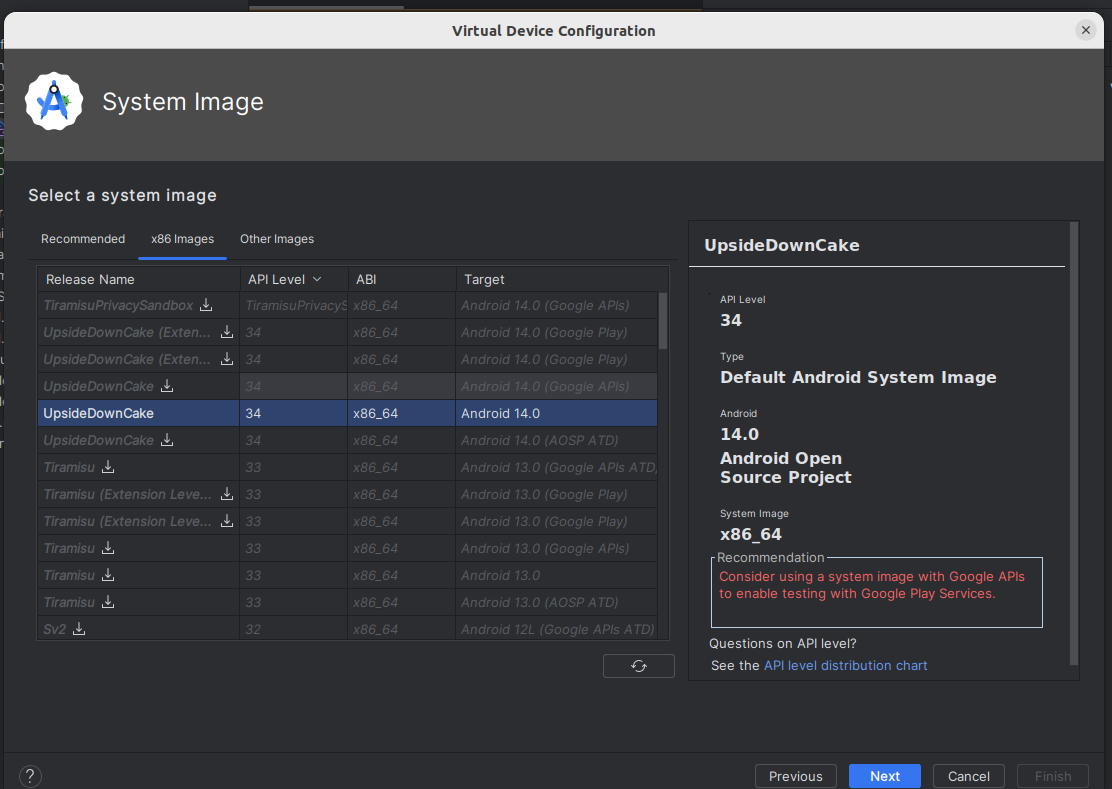
- Once setup, your new AVD will appear on the list of virtual devices.
Running on an actual device
You can test your apps on an actual device, though you have to enable the developer settings. Full instructions on this are available from the Android site. On Linux and Mac OS X as no driver is required. On Windows, a driver for your device is required, however Nexus devices can use the Google USB driver which comes with the SDK. For other devices, you can download a driver for your device from the Android developer site. See the Android documentation on driver installation for more details. To summarise, you have to download and then install the driver. Even with the Google USB driver, included in the SDK, the installation step is necessary.
You should also be able to use a real Android device if you have one.
The Android SDK Manager
One of the most crucial components of the Android SDK is the SDK Manager. This piece of software, which can be run within Android Studio or standalone, allows you to download and install versions of the SDK for different versions of Android, along with other items such as documentation. So if a new version of the SDK is released, the SDK manager allows you to download that new version. The default Studio download only comes with the latest versions of the SDK, so if you want to target older devices, you need to download older versions.
Starting the SDK Manager
On Android Studio, select Tools-Android-SDK Manager. This will launch an intermediate screen listing installation options; however for more control it's recommended you then click on Launch Standalone SDK Manager which will give you the SDK Manager as it appears if you launch it on its own without Android Studio.
Installing SDK versions from the Android SDK manager
You might want to install older SDK versions than those included by default by Android Studio. For example, you might want to install Android 4.4 and 4.0.3 (API levels 19 and 15 respectively). To do this, you need to start the SDK manager as described above, and then select the platforms you want, e.g: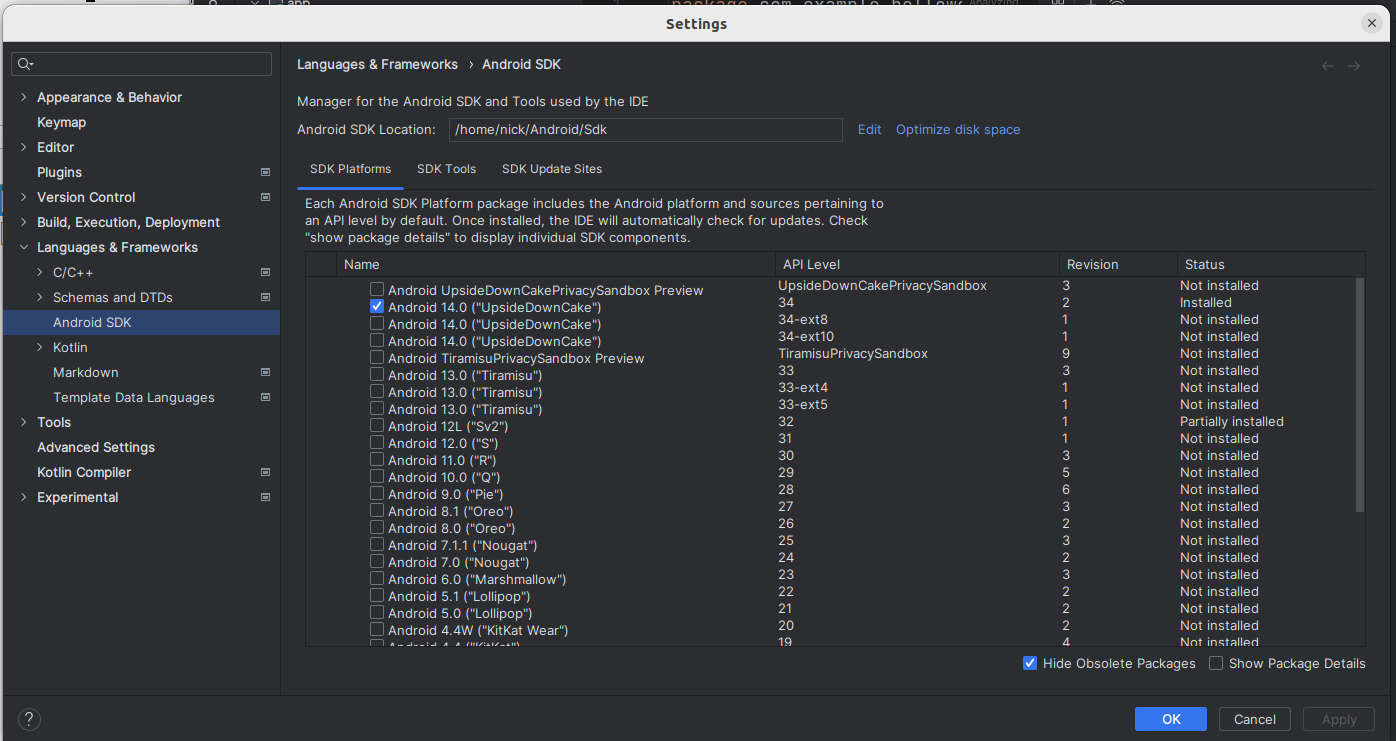
You will then need to accept the licence and it will download the individual components of these versions of the SDK.
Jetpack Compose
Android uses the Jetpack Compose UI library. We have already looked at Compose Multiplatform in OODD; Compose Multiplatform is the desktop adaptation of Jetpack Compose, which was originally an Android-only library. Everything you've learnt with Compose Multiplatform will help you develop for Jetpack Compose, and furthermore, Jetpack Compose has a number of additional features compared to Compose Multiplatform which are available on Android.
Compose Revision
You have done Compose already in OODD but the notes below are provided for revision.
Composable Functions
In Jetpack Compose, we define each component as a composable function. Composable functions typically represent reusable groups of UI elements which work together, e.g. a login composable function could contain username and password fields and a button which logs the user in.
Example of a composable function
This extension of Hello World uses a simple composable function containing two text elements.
Note how we create a function HelloComposable() labelled with the annotation @Composable. Annotations are meta-language instructions which are converted by a pre-processor into more complex Kotlin or Java code. The HelloComposable function defins a Text composable which displays a Hello World message, while the original setContent() now contains the HelloComposable.
A more complex composable function
This example creates a composable function with two UI elements: two Text elements arranged vertically. The vertical layout is defined with Column which arranges all the elements within it in a vertical column. There is also Row which arranges all elements within it horizontally.
Controlling the appearance of UI elements
We can control the appearance of a UI element by setting various parameters on the element. For example we can control colour, font style (normal or italic), font weight (normal or bold) and font family. Here is the previous example with the appearance of the Text elements styled:
Hopefully much of this is fairly clear but a few points:
Note how each argument to Text is labelled with an identifier, e.g. fontStyle=.... This is an interesting feature of Kotlin which is also seen in Python; we do not have to pass in the arguments to a function in order if we label them. So Text() for example has color and fontStyle parameters and these can be specified in any order as long as they are labelled.
Passing in Parameters
We can pass parameters into our composables and use those parameters to control how they display, e.g this composable will display a given message a given number of times in a column by using a loop to include a Text the given number of times displayed in a given colour (black by default):
This could then be included in your App as follows:
Events and State
Many UI elements in Compose Multiplatform come with an accompanying event handler, which runs when the user interacts with it. Examples include Button (which comes with a click handler) and TextField (which comes with an onValueChange event handler to handle the text in the text field changing). Event handlers are typically specified as lambda functions. We will now start building a GreetingBox which allows the user to enter their name and displays "Hello" plus their name.
Note how the TextField takes two compulsory arguments, the default text to place inside the text field, and the onValueChange event handler which runs when the user enters text (a lambda function). Note that here we have used named parameters in the TextField, we do not need to do this (as the value and onValueChange event handler are the first two parameters) but have added them for clarity.
How can we actually display a greeting in the Text corresponding to the name that the user entered, though? Or, in general, how can we dynamically update a Compose UI? We use composable state to do this. In event handlers, we update state variables, and then we include that state in other UI elements. When a state variable updates, composables which use that state variable will automatically be redrawn. This is called recomposition. If you have worked with React in web development, you will recognise this pattern.
So how do we setup state? We have to declare a state variable to represent the state. State variables are variables of type MutableState, for example MutableState<String> for a String state variable, though you don't normally need to declare the type as Kotlin infers it from your initialisation. For example:
The remember function creates a MutableState variable called nameState which is initialised within the provided lambda to a blank string "". The state will be remembered when the composable is recomposed (redrawn).
We can then insert the state variable within the UI where we like. To reference the actual value of the MutableState, we have to use its value property. For example:
- Note how we set the
valueof theTextFieldto the state variable so that the text field is always in sync with the current value of the state variable. - The
onValueChangeevent handler lambda for theTextFieldtakes the new text within the text field as its one and only parameter (it) so, in the event handler, we update the state variablenameStateto the current text in the text field. Then, in theTextelement, we include the state variable in our greeting, so the greeting will always sync with what the user entered in the text field.
Buttons
Buttons in Compose Multiplatform are quite easy to setup. Here is an example:
The Button function takes a number of parameters including an onClick event handler, for which we usually pass a lambda. Here, the lambda updates the state variable to "Clicked!" to indicate the user has clicked the button - this is shown in the Text at the end of the composable. After specifying the other parameters of Button we specify a lambda containing the text to display on the button as a Text component. In the same way as the Button and Text are child composables of the Column, this makes the Text a child composable of the button and will, as a result, make the text appear on the button.
Application resources
Android apps consist of Kotlin or Java code plus resources - additional data which the app needs to do its job. An example of a resource is an XML layout file, as described above. Resources can be found within res, as we saw above.
One example of a resource is a string resource. In Android development, to make it easier to translate apps into different languages, much of the text that we see within the user interface is defined in a string resource file so that we can easily translate an app to a different language simply by editing the string resource file. This can be found within the values folder within res, in the file strings.xml. If you look in the strings.xml file, you will see this line:
This defines a string called app_name, which specifies the application name.
Add a new line to strings.xml:
(Sorry if I have got the Greek wrong!).
Now try changing Hello World in the code example above to resources.getString(R.string.helloworld). This will read the appropriate string from the strings.xml file.
As well as strings, the res folder can contain other types of resource. These include layout files (we can define our layout in XML; we will look at this in a future week), application menus (which we will come onto a bit later on) and images. When you distribute an app, all the resources are packed into one file along with your actual code.
The auto-generated R.java file
You might be a bit puzzled as to the meaning of the R in the code you added above, i.e.
What, actually, is this "R"? It's a pre-generated Java class which contains "hooks" into your XML resource files. The R.java file, not directly accessible from Studio but present in your project, looks something like this:
Notice that it contains several static variables. These are identifiers which your Kotlin or Java code can use to access the XML, for example R.string.app_name has the hex value 0x7f040001 which is a "handle" for the app_name entry in the strings.xml resource file. Every time you add a resource to an Android app, your R.java will automatically be updated and you will be able to use static attributes of R in your Java code to access different resources. Never edit R.java directly by the way, the system will always do it for you!
Exercises
As this is the first week, in order to start gently, this exercise is revision on Compose (which you have already done in OODD) but in the context of an Android app rather than a desktop app. So this exercise is a repeat of OODD topic 7, but as an Android app. It also gives you a chance to get used to the Android Studio environment.
- Try out "Hello World" and the "TwoTexts" and "TwoTextsStyled" examples, above.
- Write a complete working app including a composable to allow the user to enter their favourite programming language in a
TextField. The composable should display, in aTextbelow theTextField, Your favourite programming language is plus the programming language the user entered. Use 24sp font size. Ensure theTextupdates whenever the user changes the input in theTextField. - In the same app, write a composable to implement a counter. The composable should include a state variable to hold the counter's current value (initialise it to 0) plus a
Textcontaining the counter's value and a button which, when pressed, increases the counter by one. Display the counter's value in red with 32sp font size. In the same app, write a composable to convert feet to metres. One foot is 0.305 metres. The user should be able to enter a value in feet, and the result should be displayed in metres. Give your
TextFieldalabelparameter, this should be set equal to a lambda containing aTextelement with the label "Enter feet", i.e.:- Hint! Store the current feet as a
Stringstate variable and usetoDoubleOrNull()(see below) when you need to do the conversion. This will be easier than storing the feet as aDoublestate variable. - Hint 2: the
toDoubleOrNull()method ofStringwill return anullif the user enters something which is not a number (e.g. letters). You can make use of this together with the Elvis operator to set the value to 0 if the user enters a non-numeric value for the feet. You can also use it to display an error if the user enters a non-numeric value - have a go at this if you finish everything else.
- Hint! Store the current feet as a
Write a simple front-end mock-up of a login system. The application should have username and password single-line
OutlinedTextFields and a "Login" button. When the user enters the username "alex" and password "password", and clicks the "Login" button, the UI should recompose to show the message:plus a logout button. Similarly, the "Logout" button should cause the UI to recompose to show the login form again. Incorrect logins should result in an error message being displayed, but you should still show the username and password fields and "Login" button. Look at the documentation to find out how to hide the text when entering the password.